What is Billing?
When providing professional services there is always a billing element. This consists of invoicing the customer for the work delivered, receiving payment, and recognizing revenue.
When it’s hard to figure out what should be billed, it’s also then hard to get the payment on time.
Precursive will help you to get paid faster by giving you the ability to invoice multiple times during the project based on:
- time and expenses from a selected time period
- a fixed price
It’s never been easier, especially for Time & Materials projects. Just start creating the invoice and Precursive will collect all the data you need.
Getting started with Billing
⚠️ Before you start:
- Make sure you have the Precursive PSX Spring '21 Release installed in your org and assign the Precursive Billing Admin permission set to users who should have create and edit permission to Invoices
- In Precursive, invoices are created based on time entries and expenses that are marked as billable so it is very important to make sure that the time and expenses that should be billed are set up correctly before you create your first invoice.
How to check it?
Billable Time
Go to the Time Code tab and make sure you have a Time Code that is set up as ‘Billable’ and ‘Contributes to Revenue’. Check now your projects, phases, and activity categories, if they have the right Time Code assigned as only those time entries, will appear in the Billing module when you start creating your invoices.
Billable Expense Categories
Check if the Expense Categories that you are using are marked as billable (by default, all-expense categories are created as billable) you can do it by adding the ‘Billable’ field to the Expense Category related list on the Phase layout.
Create an Invoice from a Project or Phase
As you can do it from the project, phase, account, or invoice page, navigate to one of those first.
To create the invoice:
- Click on ‘New Invoice’
- Fill in the required fields
- You can include more than one project and phase on the invoice, the only limitation here is that they need to be for the same account and currency
- Select the budget method (fixed price or time and expenses). In both cases, the entries and expenses from the selected time range will be assigned to the invoice by default. This will help you identify what was already invoiced to the customer, even if you have an agreed fixed price.
- Group Invoice Line Item by - this defines what will be the grouping and descriptions of the line items. You can group them by Role, Resource, Account (single-line), Activity Category. This means that each different Role, Resource, Account, or Activity Category will be separate lines on the invoice.
- The ‘Invoice Date’ by default sets up to the current day
- The ‘Due Date’ by default sets up to 2 weeks after the ‘Invoice Date’
- ‘From’ and ‘To’ dates define which timesheet entries and expenses should be included in the invoice elements. When selecting the time frame, all billable time entries and expenses from billable expense categories from that time range will be assigned to this invoice.
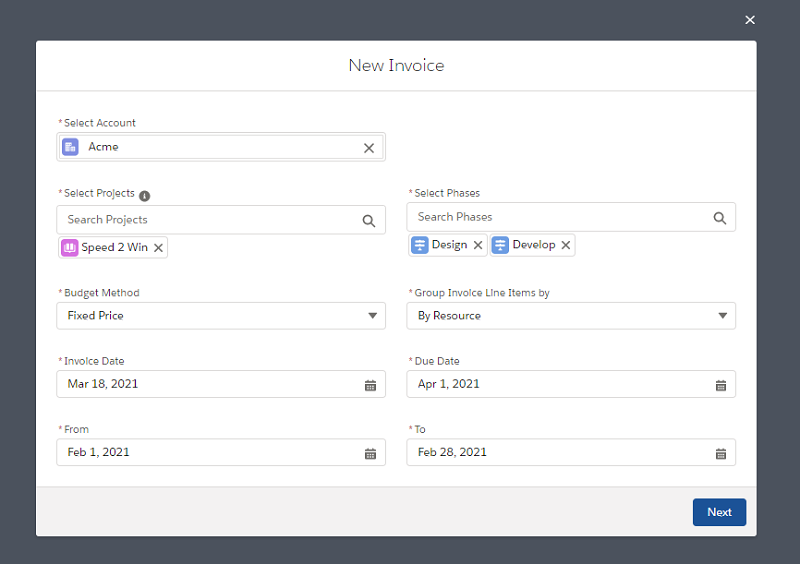
As soon as you finish filling in the basic information about your invoice, click Next to navigate to the next screen.
By default, the first screen gathers all time entries that have a billable time code assigned and presents you the summary of actual hours and total Revenue calculated based on those actuals. If some of the timesheets included in this time range aren’t approved yet, you will see a warning icon next to the Total Entries Revenue. To see exactly what entries have been included in the invoice, expand the list by clicking the arrow next to the Selected Entries header.

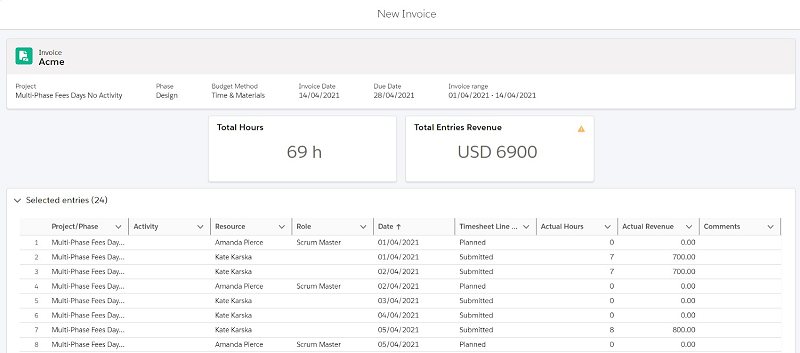
In the table, you will be able to see:
- Project/Phase
- Activity - only if time was logged against the activity
- Resource Name
- Role
- Date
- Status of the Timesheet Line
- Actual Hours
- Actual Revenue based on the Actual Hours
- Timesheet comment
If there are lots of entries included, you might need to click ‘Load more’ at the bottom of the screen to see the full list.
Click ‘Next’ to navigate to the Expenses summary. Here, by default, the first screen gathers all expenses that have a billable expense category and presents you the expenses Revenue Summary. If some of the expenses included in this time range aren’t approved yet, you will see a warning icon next to the Total Expenses Revenue. To see exactly what expenses have been included in the invoice, expand the list by clicking the arrow next to the Selected Expenses header.
To save the Invoice click 'Next'.
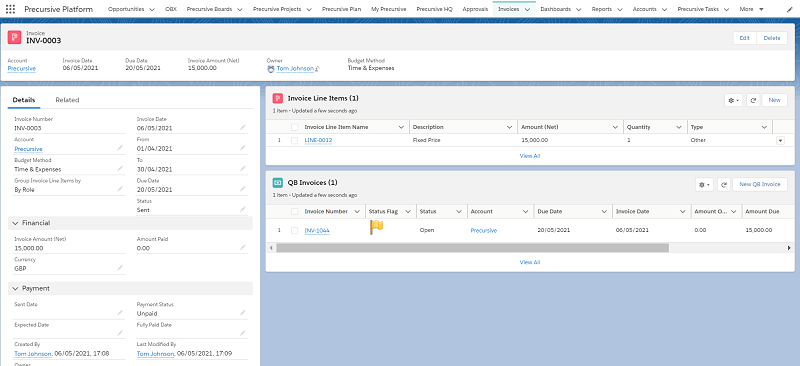
Precursive Billing can be integrated with popular accounting systems. If you would like to try it, contact your Customer Success Manager.