The Resource Plan enables you to assign the people with the requisite skills to each project. You can visualize resources capacity, quickly filter your resources and assign the work all in one place. Let's see how.
How to navigate Resource Plan
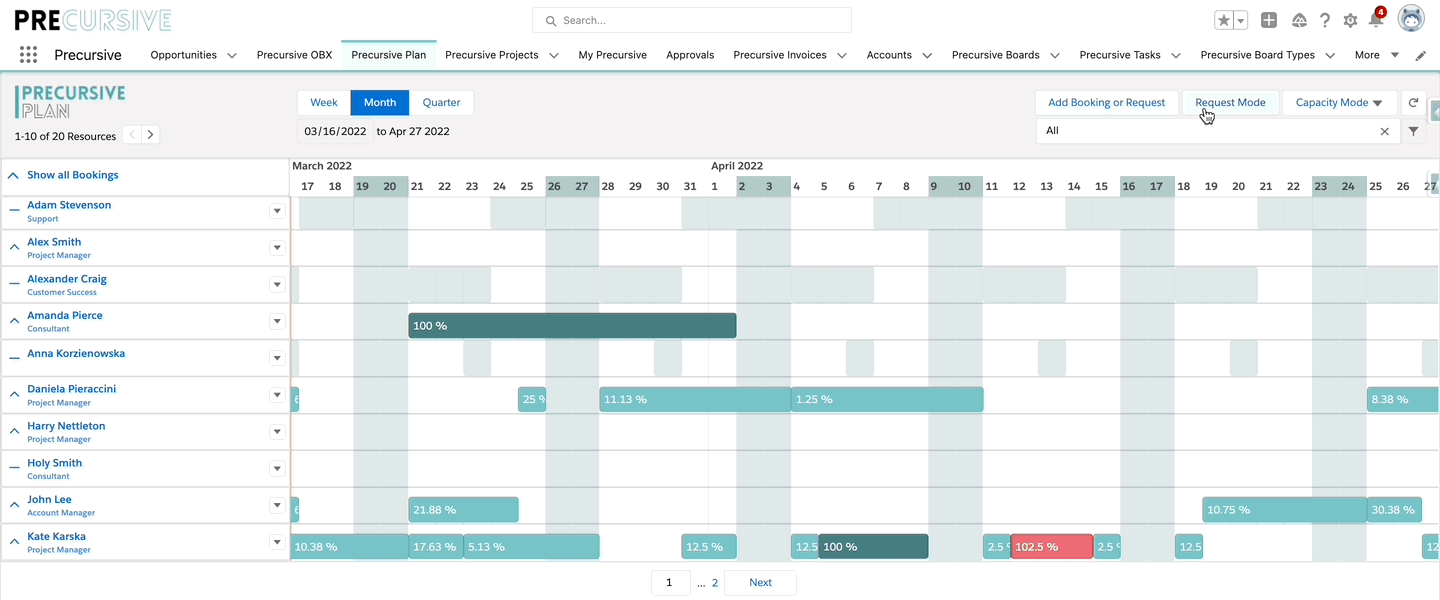
Navigate to the 'Resource Plan' tab. Here you will find:
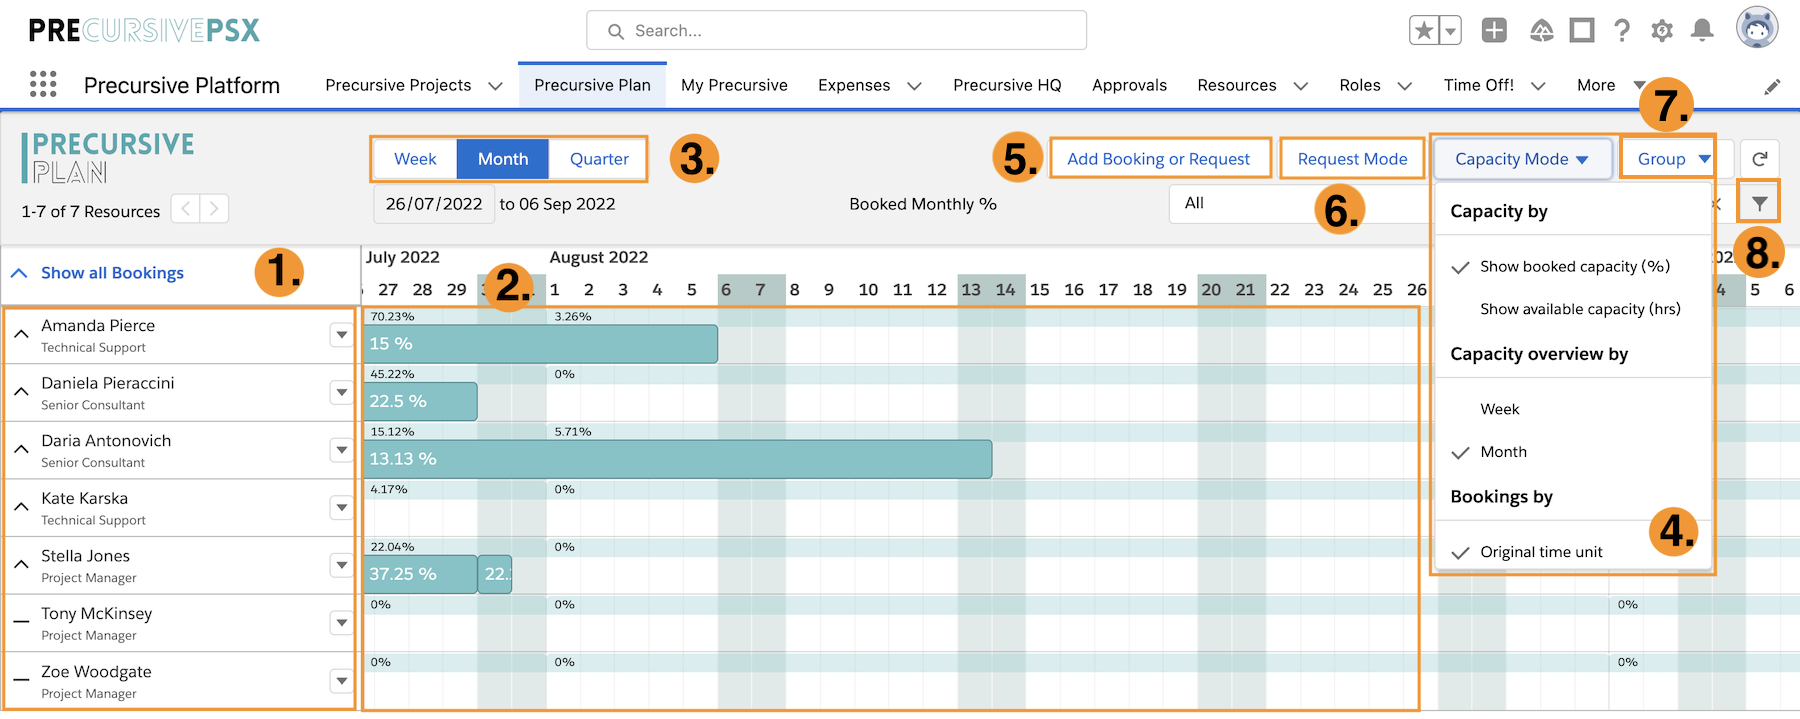
- Resources are listed on the left-hand side.
- Resources’ Capacity & Bookings are displayed on the right hand-side (once they are assigned to planned or confirmed bookings). Here you can see two layers of capacity: granular capacity expressed as a % or hours per day and a blended overall weekly, or monthly capacity summary (in the thin line above each resource's capacity). You can click on the arrow next to the resource’s name to show the details of their single bookings. Here you can expand your resource (drop down arrow to the left of their name) to view their bookings and project assignments.

Hover over the capacity bar of each resource or their bookings to visualize additional details.

- Time Frame - Click on the relevant button to look at weekly, monthly or quarterly capacity for your resources.
- Capacity Mode can be changed and it can be displayed in hours or as a percentage. Bookings can be displayed per Total Hours, Days or Hours per Day. Please see Change Capacity, Availability and Booking Views to learn more.
- Add Booking or Request - this button is only relevant for Precursive PSX and Connect if used in Independent Mode (Add Booking or Resource Request)
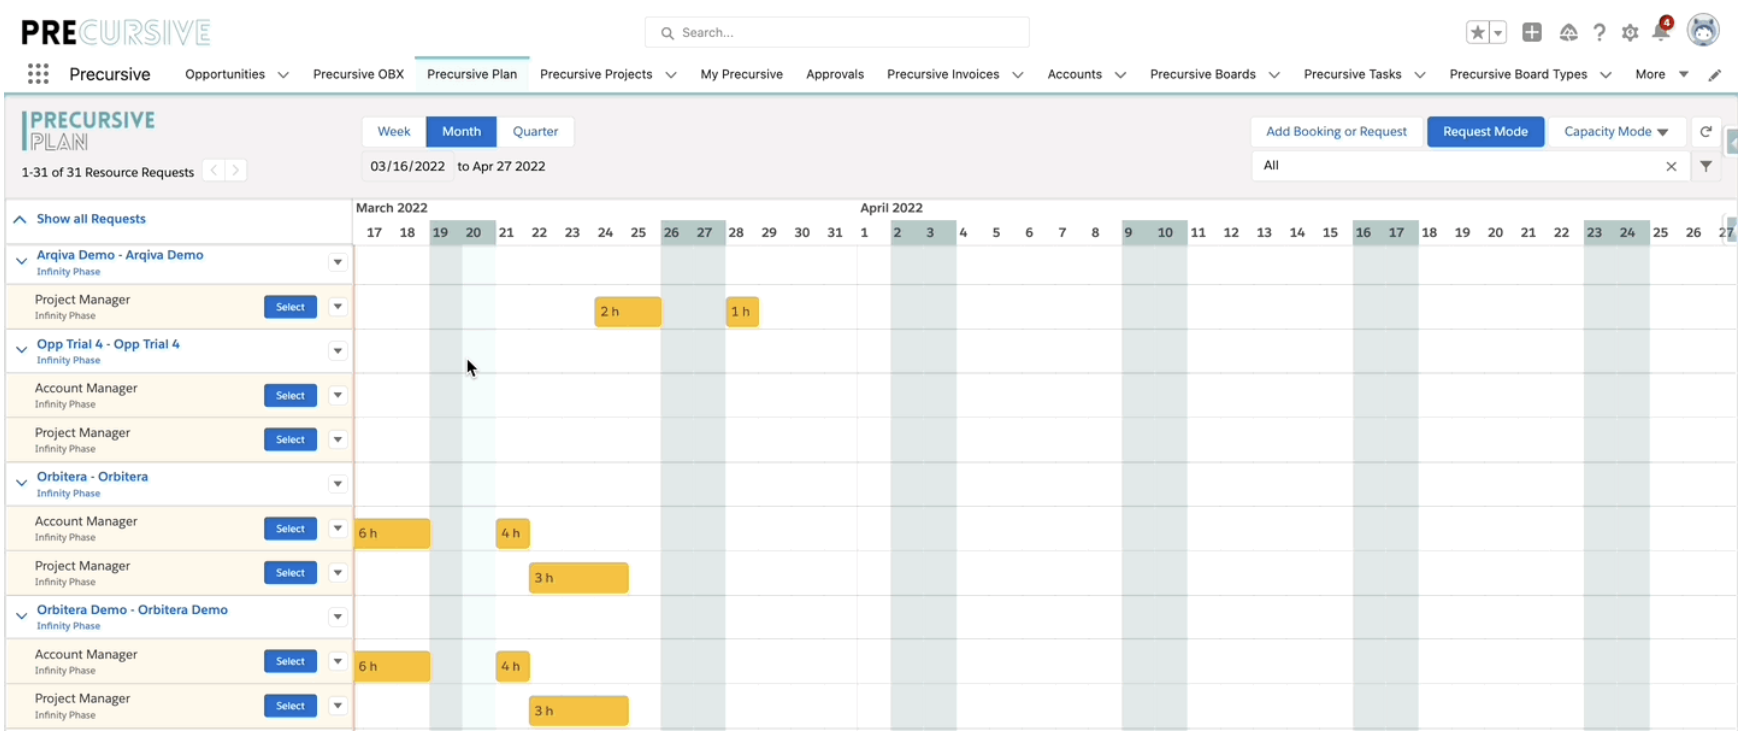
- Request Mode - here's where you can click for Managing Resource Requests. Here you will find a list of your projects and requested roles for each. On the calendar you will find the requested hours.
- Group your Resources by Name, Role or Department
- Filter your Resources to find the perfect fit for each job
Change Capacity & Booking Views
In Precursive, there are multiple ways you can look at the capacity/availability of your team from the Resource Plan. Being able to predict your team's capacity is key in order to plan and organize. It not only helps in your team's productivity and well-being but also helps your ability to make your customers successful. When looking at your team's schedule, you might want to see how their bookings affect their workload overtime and identify where there is still some spare capacity or where people are overbooked.
Here's how you can change the way you view resources capacity and bookings details according to your personal preference.
How to Edit Capacity & Bookings Views
View Capacity By
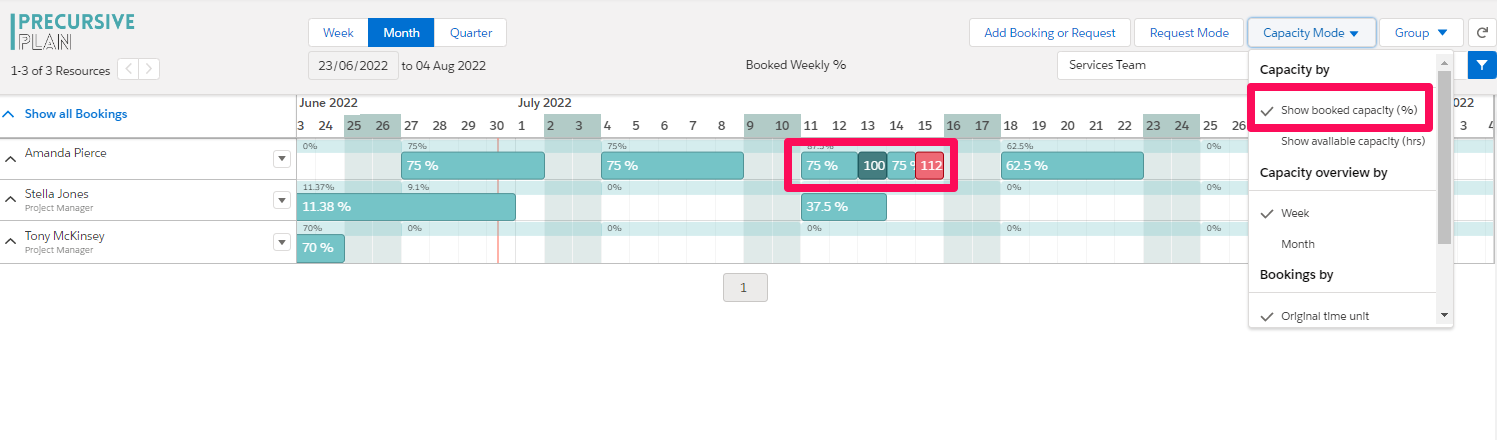
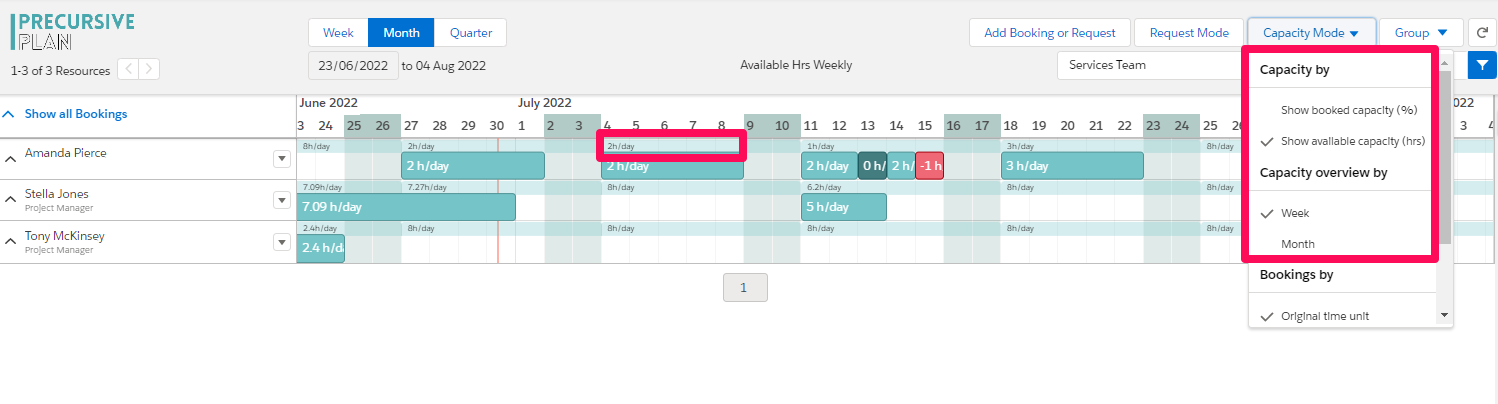
From the Resource Plan, click on the button 'Capacity Mode'.
Capacity can be displayed as
- Booked capacity in % or
-
Available hours per day
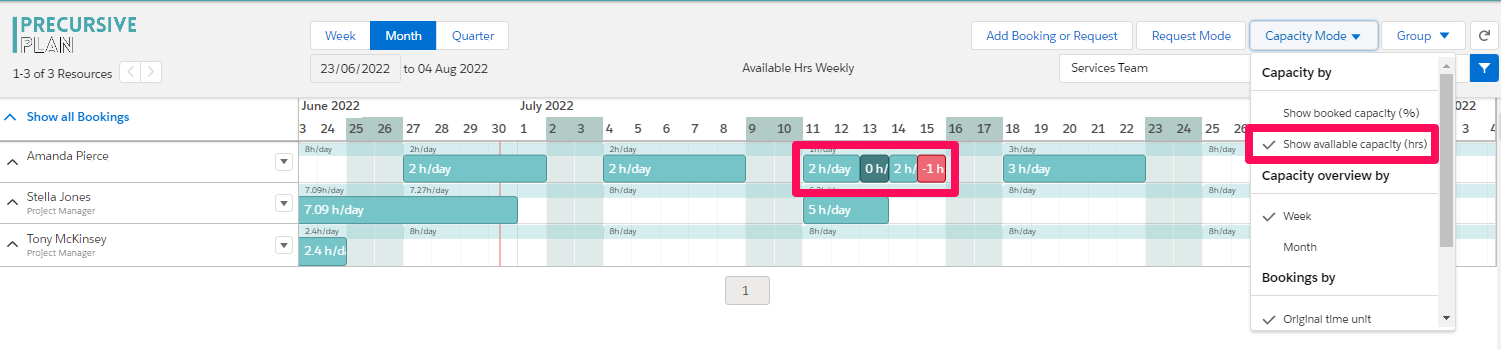
In the example above, you can see that Amanda is overbooked on Friday by one additional hour and has two hours per day available Monday and Tuesday and on Thursday.
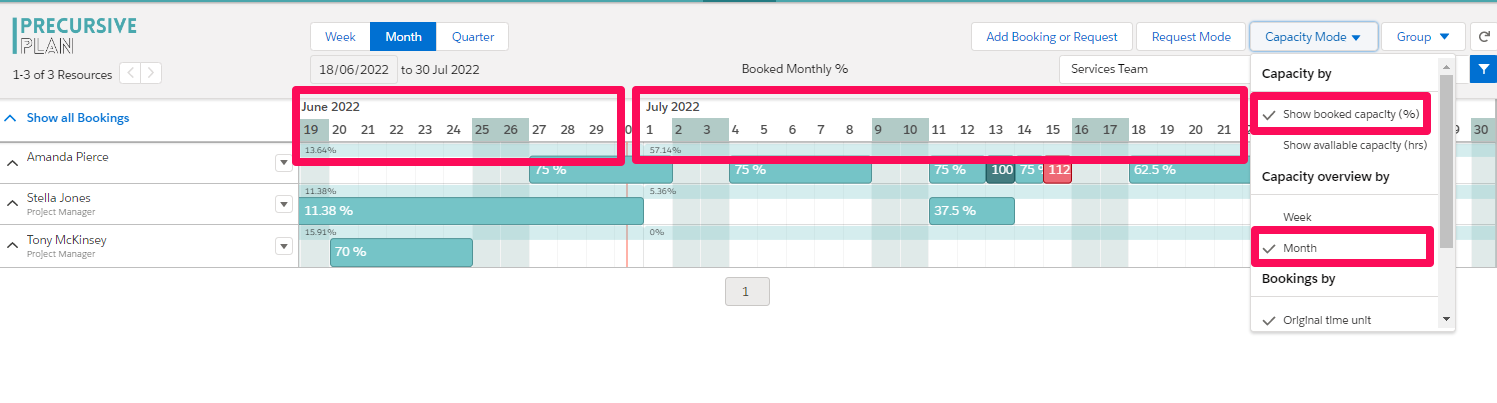
View Capacity Overview By
On the Resource Plan you can also see weekly and monthly average capacity by looking at the Capacity Overview. From the Capacity Mode you can select the time frame you would like to check the average for. In line with resources' specific capacity, this also can be displayed as booked capacity in % or available hours per day. Here are 2 examples:
- Average Weekly Available Hours per Day
Booking By
From the Capacity Mode you can also decide whether you want to see bookings in total hours, total days, or hours per day.
You can change your view at any point. Select one of the options in the Capacity Mode dropdown menu and the schedule will adjust immediately as a result.
Filter Resources on the Resource Plan
You can use Precursive filters on the Resource Plan to check capacity of specific groups of resources. You can filter by a variety of objects and fields, such as Resources
Name, Department, Projects, Roles, Tags, Projects, Phases and Participants.
You can save your most common searches as
Private Filters. If these are relevant for the rest of your team too, you can ask your Salesforce Admin to
Set up Public Filters. The first ones are only visible for you, whether the second are available to all Precursive users with access to
Resource Plan.You can use filters for 2 objectives:
- When visualizing bookings and capacity, to check them for a specific group of resources
- When managing your Resource Request, to find the best people for the job
Note - if you need additional Filters or would like to filter your Resources by a Custom Field, you can Add Custom Fields as Filtering Criteria on the Resource Plan with the help of a Salesforce Admin.
How to Filter Resources
-
On the Resource Plan, navigate to the filter icon to the right of the page and select a combination of criteria you want to filter by, such as name of the resource, department, projects, roles, tags, etc. then click Apply
-
Once you create your filter you can save it as default by ticking the Save as Default at the bottom of the filter pop up.
How to Create Private Filters
Create your own selection of private filters accessible from the search bar for a quick and easy access to your most frequent searches. Create a filter, click on the arrow icon next to Apply, select Save As, name your filter, and Save. You can now access this filter from the filter search bar.
How to Use Filters for Managing Assignments
You can also use Precursive Filters to narrow down your search on the Resource Plan to find exactly what you are looking for. You can filter your resources by:
- Resources fields - for example, by Role or to pull out resources operating in a specific location
- Resources Tags - find people with the right skills!
- Project
- Phase

Managing Bookings from Resource Plan
This content of this article is relevant for Projects with Phases set to:
This content is not relevant for Phases set to:
Learn more about Resourcing Modes here.
Add a Booking or Resource Request
Navigate to the Resource Plan and click the 'Add Booking or Request' button
- Select Participant to create a booking for a specific Resource
- Select Request to add a resource request for a Role. This request will have to be assigned to a specific resource on a later date.
Fill the relevant fields in the window that pops open:
- Resource (if selecting Participant)
- Project
- Role
- Start/ End Date of the booking / Request
- Booking Mode: you can decide to add the time as Total Hours, Hours per Days or Total Days
- Enter Total Hours / Hours per Days / Total Days
- Status: is the booking forecast or confirmed?
- Non-Working Days: when selected the booking will create planned time on non-working days e.g. weekends and time-off days (like national holidays). When not-selected the time will be assigned only to working days.
Edit a Booking
- Navigate to Resource Plan
- Right click on a Booking
- Select 'Edit'
- Make your changes (e.g. Dates, number of Hours/Days, or Status)
- Click 'Save'
Edit Bookings in bulk
- Press CTRL / Apple Command and select the Bookings you want to edit
- Right-click on one of them and select ‘Edit selected’
- To edit the Time value, first select the Booking Mode, then enter the Time, and Save
- You can also edit only the Status, to do so, just pick one of the statuses from the drop-down and Save
- Once you confirm by clicking Save, only the bookings which can be edited will be updated with the new values
Note - You can edit in bulk all the bookings assigned to each Resource, but you cannot edit different bookings across multiple Resources at the same time. If some of the selected Bookings cannot be edited, (for example because there is time submitted against them) you will see a red icon next to them. To understand the reason why a booking cannot be edited, hover over the red icon.
Move a Booking
- Right click the Booking and select Move from the drop-down options. Once the Move Booking window appears, select the new start date and confirm the operation by hitting 'Move'.
Note - This functionality doesn't allow to move bookings which have already some Actual Hours logged or are assigned to weeks which are already submitted/approved.
Reassign a Booking
- Right click on the Booking
- In the window that opens up on the right-side of the screen, insert the Resource you would like to Reassign the Booking to + toggle 'Reassign this and following bookings' if you would like to reassign all the Bookings for that Project Phase to the specified Resource
- Click 'Save'
Delete a Booking
- Right click on the booking you’d like to Delete
- In the pop up window, scroll down and select 'Delete'
Note - You can't delete a Booking with Actual Time submitted. If one your diligent colleagues submitted their timesheet already, ask them to recall it, or do it for them if you are the admin.
Delete bookings in bulk
- Press CTRL/ Apple Command and select the Bookings you want to delete
- Right-click on one of them and select ‘Delete selected’
- To confirm, click ‘Delete’ when the Delete bookings window opens
- If some of the selected bookings cannot be deleted (e.g. when there are Cctual Hours logged and submitted against those), in the Delete bookings window you will be notified how many of them can be deleted
- To understand the reason why a Booking cannot be deleted, hover over the red icon
- Once you confirm by clicking Delete, only bookings which can be deleted will disappear from the Resource Plan
Split a Booking
- Right click on the Booking and select “Split”
- Choose a Date for the Booking to split
The Split feature allows you to split your booking by days, which then lets you move one part of that booking to a different start date. This is useful when someone is overbooked. Once a booking is split in two, you can edit them separately and change their amount of booked hours or duration, as well as reassigning them.
Quick Booking
- Select the Quarterly view
- Double click on the selected week
- In the pop up booking widow, check the details, and enter the number of hours if it’s not already assigned
- Click 'Save'
Quick bookings can be automatically populated with the assigned working hours of any resource on the Resource Plan, which can save a lot of time when making bookings.
Repeat Bookings
- Identify the booking you’d like to repeat and right-click on it
- From the options available select Repeat Booking
In the pop-up window you can choose either:
- the number of intervals required and the frequency of the repeat (weekly/monthly). For example, you could repeat a booking once a week over a 5 week period by selecting 5 under “How often” and Weekly under “Frequency”.
or:
- to repeat a booking with a specified end date, in the same pop-up window select “Date”, pick the end date and decide on the frequency; then click Save.
The Repeat Booking feature simplifies the creation of reoccurring bookings, without the need to duplicate it manually, every time a booking needs to occur multiple times. You can choose how often you’d like the booking to repeat over a period of time and when the repetition comes to an end.
Tip: In case your repeated booking covers some non-working days, it is recommended to manually adjust the date range.
Managing Resource Requests
Precursive allows you to see what resources are available and rightly skilled to take on the upcoming work.
How to Assign Resources
1. Finding the requests
-
Go to Resource Plan and click on the 'Request Mode' button on the top right
-
On the screen you will now see your list of resource requests
-
Click on the 'Select' button next to one of the requested Roles
-
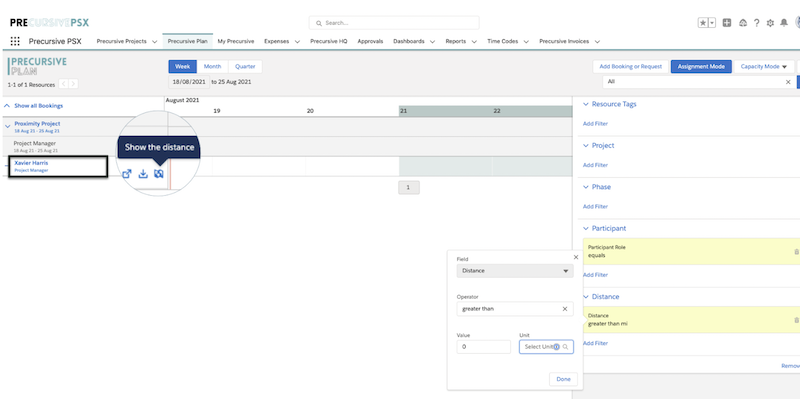
A filtering tool will pop up on the right side of the page - by default that will filter your resources by the selected role, but you can add some additional filters to find the right people for each job (i.e. Tags that mark specific skills)
2. Use the filter to find people who match the criteria from the request (e.g. Consultant with Prince2 expertise)
-
Click 'add filter' in the Filtering Pane under the relevant object: for example, you can filter by resource name, tags, or projects they are working on, Participant details or even distance from the Project's location, if you have that feature enabled.
-
Select the 'Filed', 'Operator' and 'Values' in the window that pops up to define your filtering criteria (e.g. Resource Role = Consultant or Tags = Prince2)
-
Press 'Apply'
3. Assign your request to the selected person
-
From the window that pops up at the bottom of the page with a list of your filtered resources, identify the person who is available to do the work (their capacity and availability is indicated on the stripe)
-
Click on the 'Assign' button next to the resource to make the assignment
You can now repeat the same process for all of your resource requests. Once you have finished, you can go back to the original view by clicking on the 'Request Mode' button again to de-select it or on the 'Resource Plan' tab to refresh the view.
Proximity Search
When your teams are spread across the country or globally and your projects require some traveling, the distance between the project team and your customer can have a huge impact, not only on the travel costs but also on the success of your project and your team’s work-life balance. With Proximity Search, you can easily find out what employees are the closest to a project site.
Note - Before Proximity Search can be used there are some manual steps to be configured by an appointed Salesforce Administrator. For more information please review Precursive’s help article - Proximity Search Configuration.
How to use Proximity Search
Here's how you can manage your Resource Requests and filter resource by distance from a project:
- Go to Resource Plan and click on the 'Request Mode' button on the top right: on the screen you will now see your list of resource requests
- Click on the 'Select' button next to one of the requested Roles
- A filtering tool will pop up on the right side of the page - by default that will filter your resources by the selected role, but you can add some additional filters to find the right people for each job, including distance!
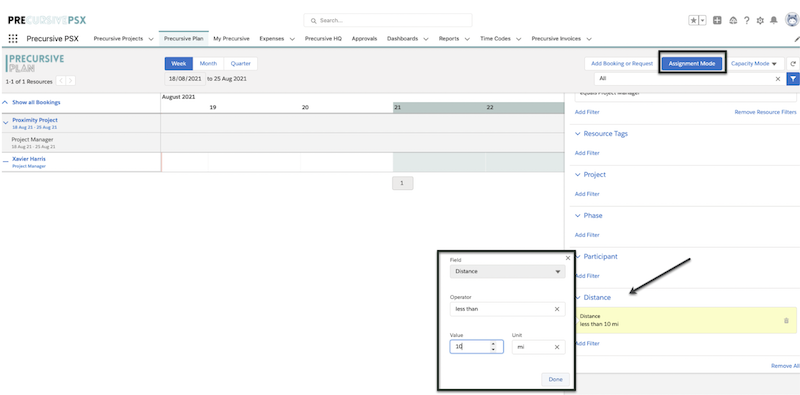
In the 'Distance' section of the filtering tool you can click on 'Add filter' and fill with the relevant information:
- Field = Distance
- Operator = Less Than or Greater Than.
- Value = Numerical
- Unit = km or mi
You can use this filter to find what Resources you have available in close proximity to the project location. Once you're done, click 'Done' and then 'Apply' at the top of the filtering tool!
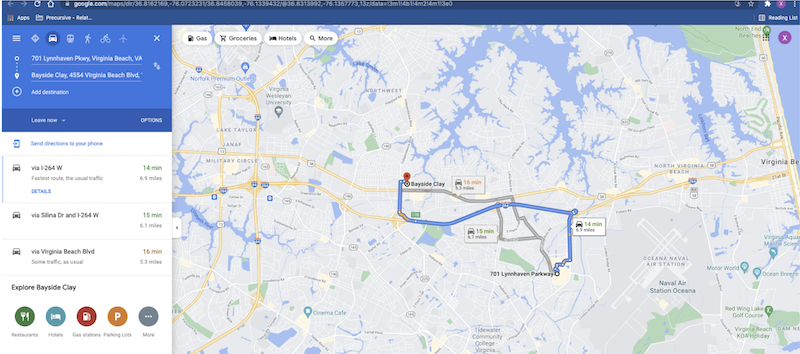
If you want to view the distance in Google Maps, you can then select map icon next to a Resource name.
Once you've found your perfect match, go ahead and click 'Assign' next to the resource name to book them for that project.