- Go back to the Salesforce Setup > Sites
- You will be asked to 'Register My Salesforce Domain' - tick the checkbox you find there and click on 'Register My Salesforce Domain'
- Scroll down and click on the 'Precursive Public Share Services' label
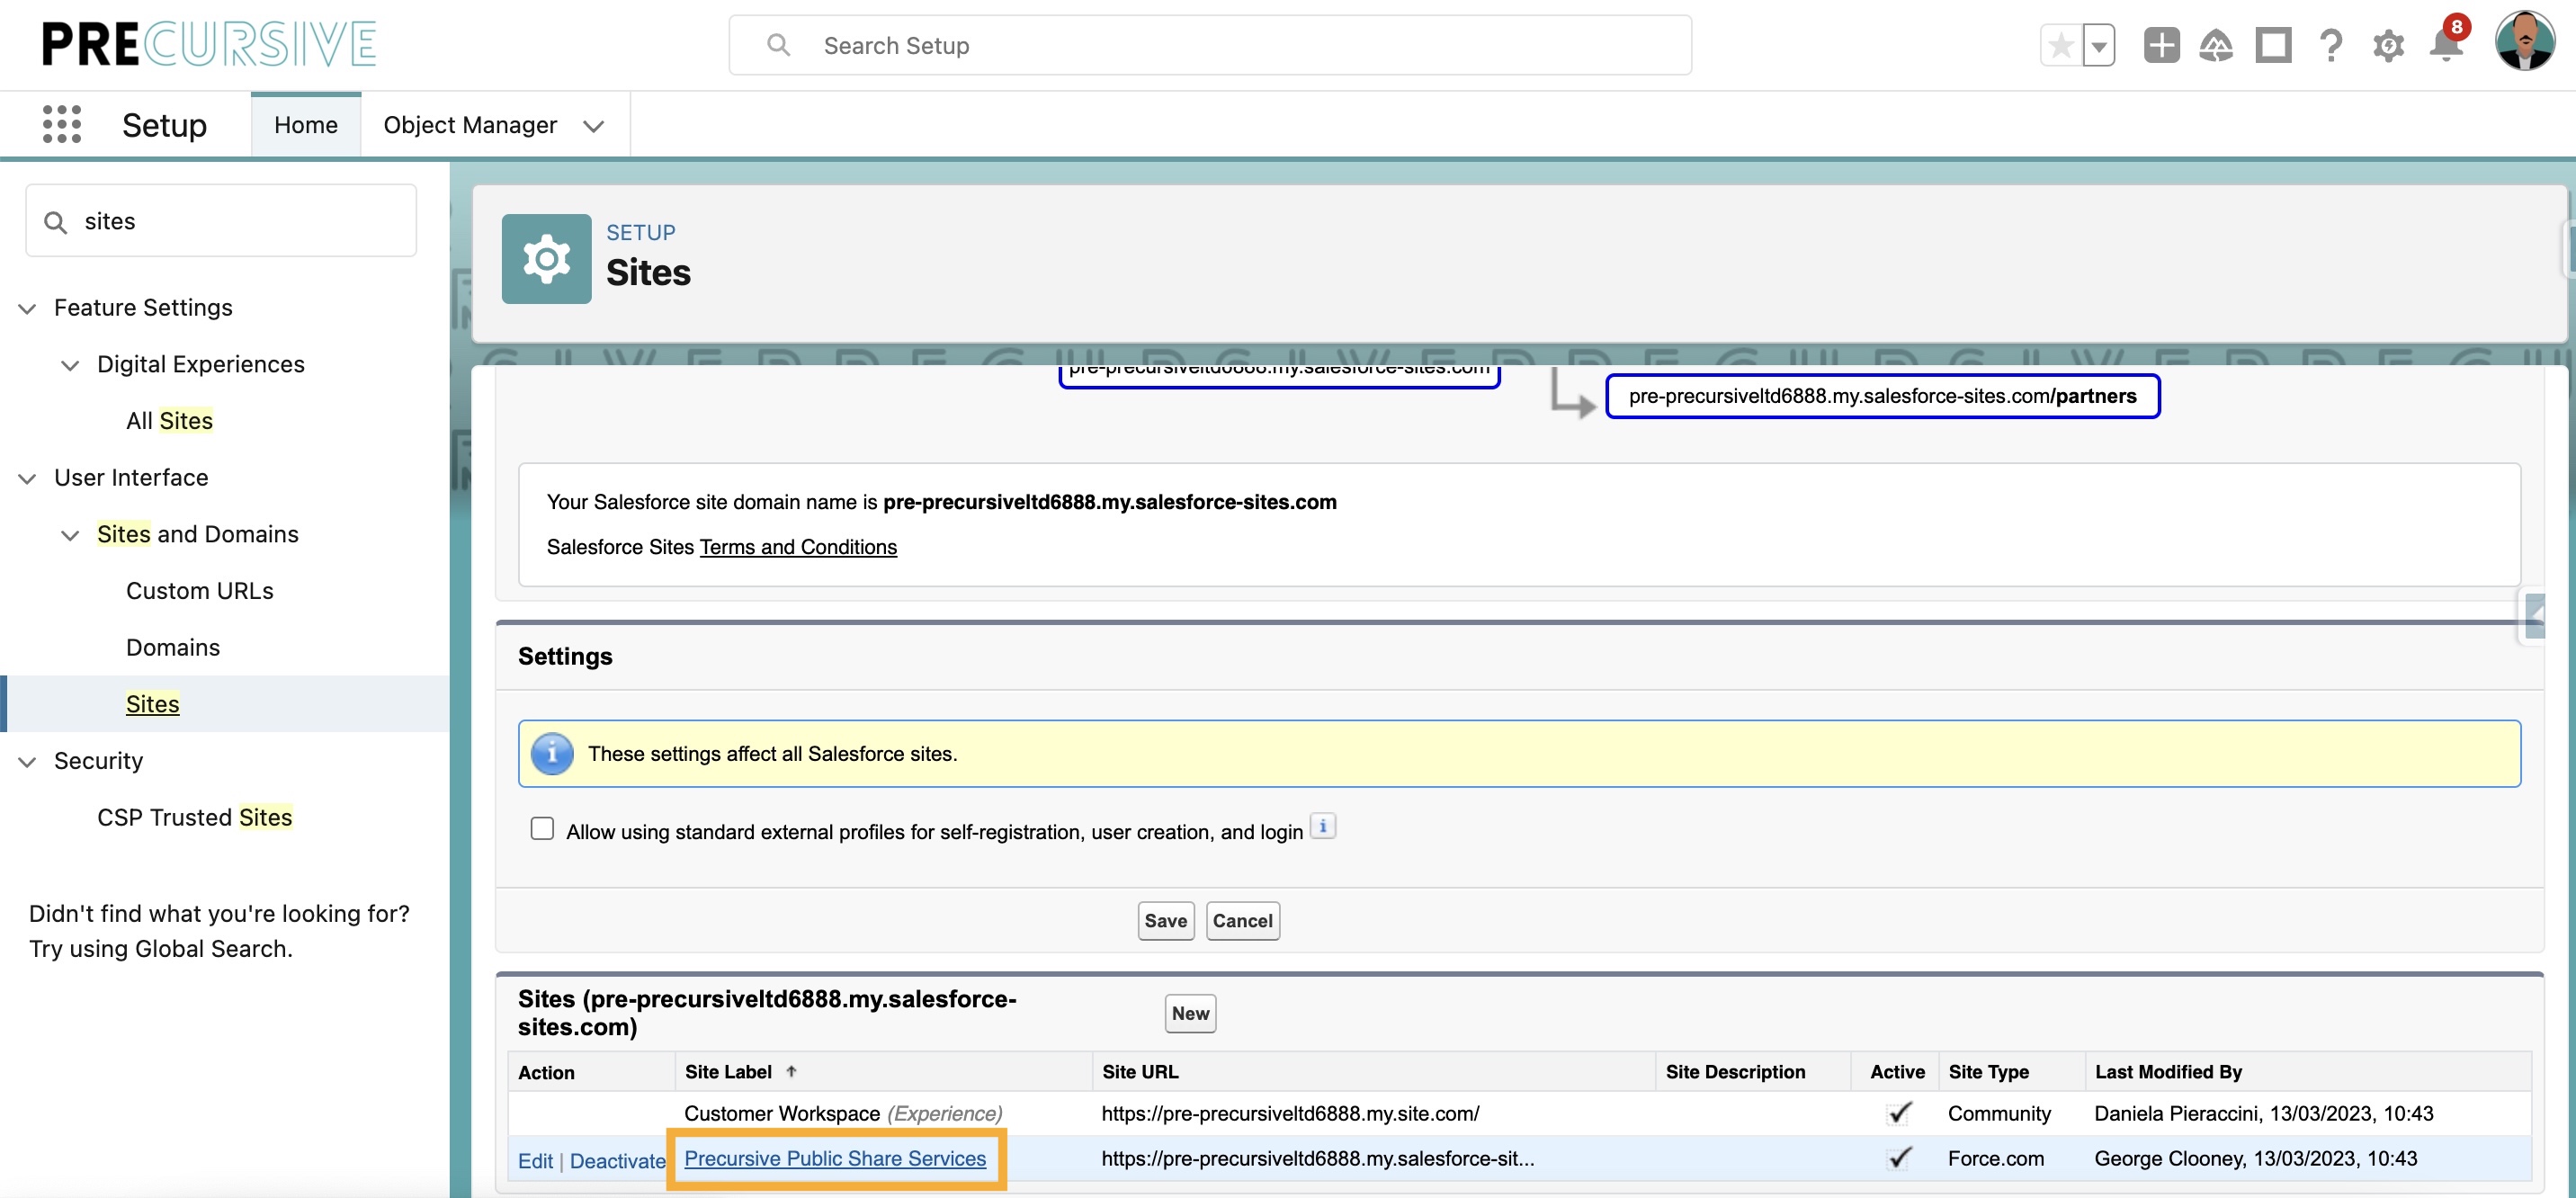
- Scroll down to find the 'Custom URL' section
- Click 'View'
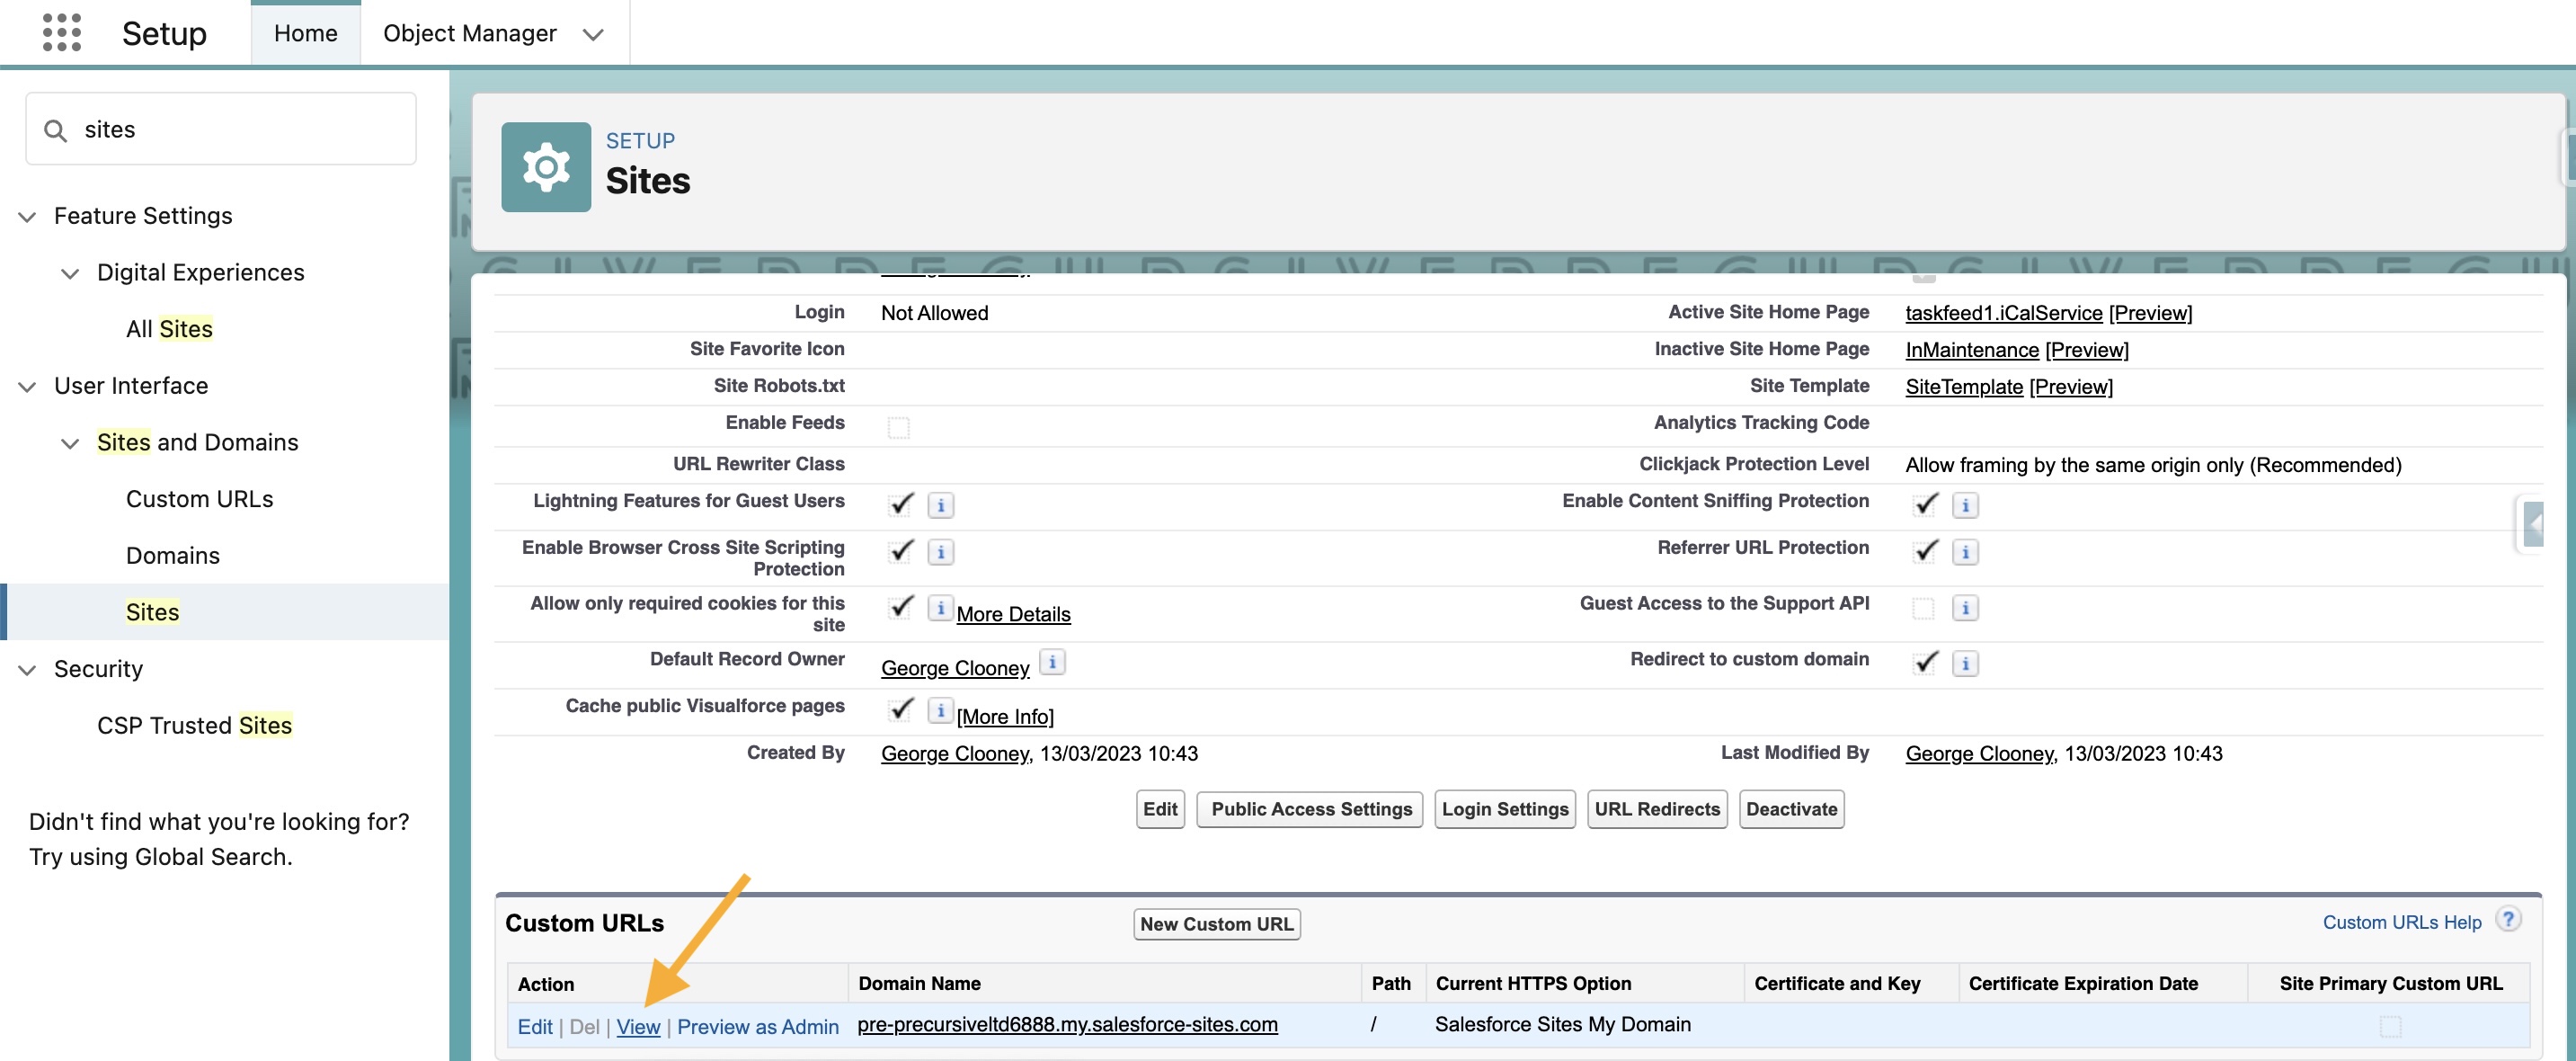
- Copy the URL of the page that opens up

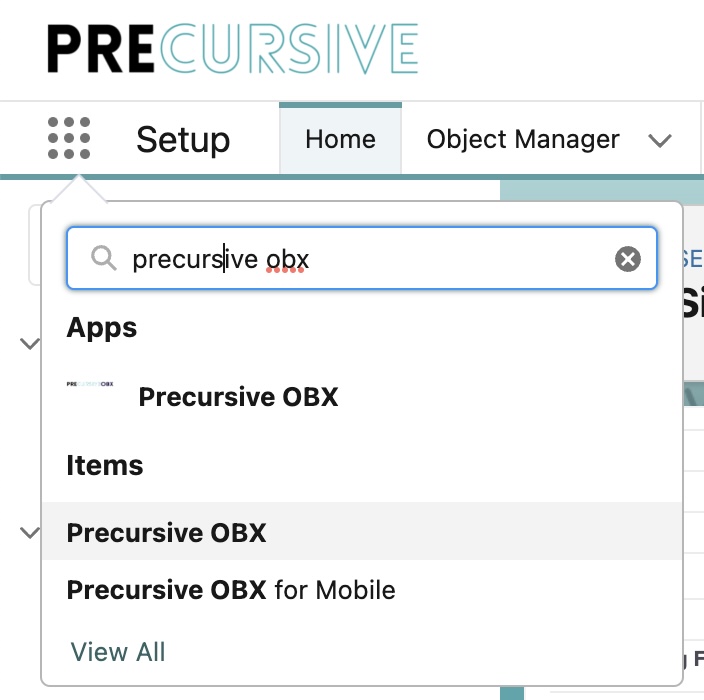
- Use the AppLauncher to navigate to the Precursive OBX tab
- Click on the wrench icon on the bottom left to access the 'Application Settings'

- Navigate to the 'External Sharing' tab and paste the link in the 'External Sharing Force.com Site URL' field
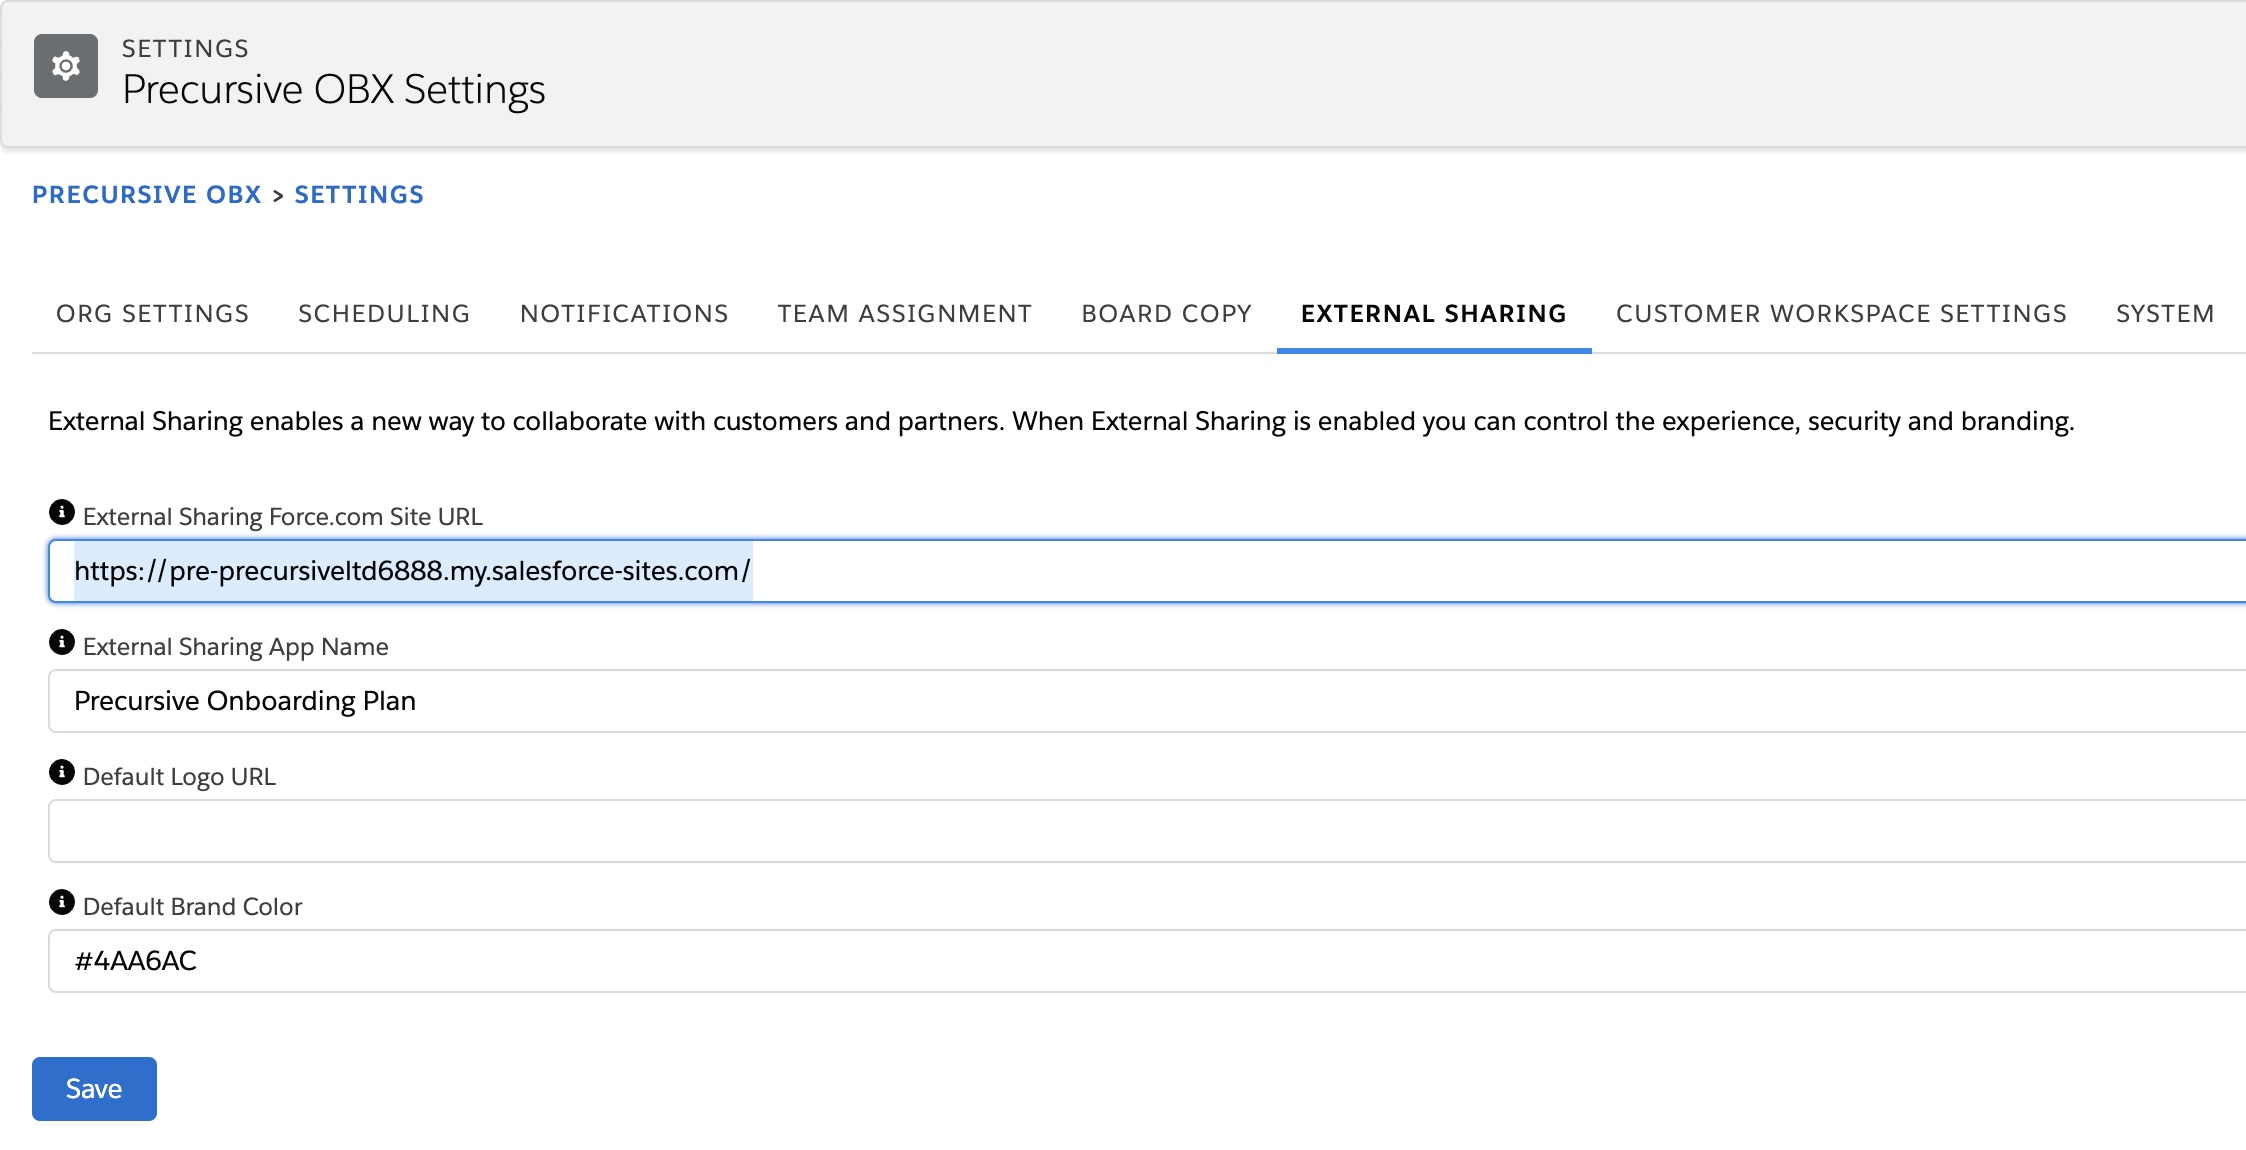
- Click Save.
Setup your Logo for External Sharing
When sharing Boards with customers, it would be great to have them branded with your company colors and logo. And you can set these up when you
Set-up External sharing if you have an image URL readily available.
However, if you don’t have access to any hosting for your images (a website server or service to host images on) or if you want to take your logo to the next level and prevent loading delays, the best option that we recommend is to use Static Resources.
What are Static Resources?
"
Static resources allow you to upload content that you can reference in a Visualforce page, including archives (such as . zip and . jar files), images, style sheets, JavaScript, and other files." (cit. Salesforce Dictionary)
How can that impact my loading time, you ask? Using the link that Salesforce creates for your image makes it easier for the system to load it than an external URL. Or, in other words, if you are keen on technical terms as we are..Static Resources allows for a much shorter URL to input and because you're not cross-referencing the full environment request twice when external sharing (once for loading the page, and one for the image), the page will load much faster.
If we have convinced you with these scientific facts, here below you can find all steps you need to follow to setup up your logo using Static Resource!
How to Setup your Logo for External Sharing using Salesforce Static Resource
- Navigate to the Salesforce Setup and look for 'Static Resources' in the quick find box (you will find it in the Custom Code section)
- When presented with the list of Static Resources, click on the 'New' button, add a memorable Logo Name and click the Choose file button to select the desired logo you want to upload:
- Once you've clicked the Save button, you'll be taken to the Resource screen. If the image has uploaded correctly, you'll see a value greater than 0 next to the Size field - if not, click the Edit button and attempt to upload it again. If successful, you'll see the following View file link underneath the Size field:
- Click View file and it will open the image in a new tab in full resolution. Right-click on the image, and click 'Copy Image Address':
- You now have the logo image location in your clipboard! Navigate to the Precursive OBX tab. Click on the the Spanner icon in the bottom-left corner to open Application Settings:
- Then navigate to the External Sharing tab and paste the copied image address into the Default Logo URL field, removing everything before '...resource/' so all is remaining is resource/[iD]/NameOfResource. Once populated, click Save.
If that's been done correctly, you should see the logo populated when you open any shared Board in another tab!
How to set up the External Sharing option as 'Public' by default
By default, Precursive Boards are private and can only be visualized by their assigned Team Members. If you want to
Share a Board with External Sharing, you first need to set the External Sharing field to 'Public'. This step can be skipped if you set the picklist value for this field to 'Public' by default.
Note - This is not recommended to prevent security breaches!
How to Set Up External Sharing Option as 'Public' by Default
- Navigate to the Salesforce Setup
- Click on Object Manager
- Look for 'Precursive Boards'
- Click on 'Fields & Relationships'
- Look for and click on 'External Sharing'

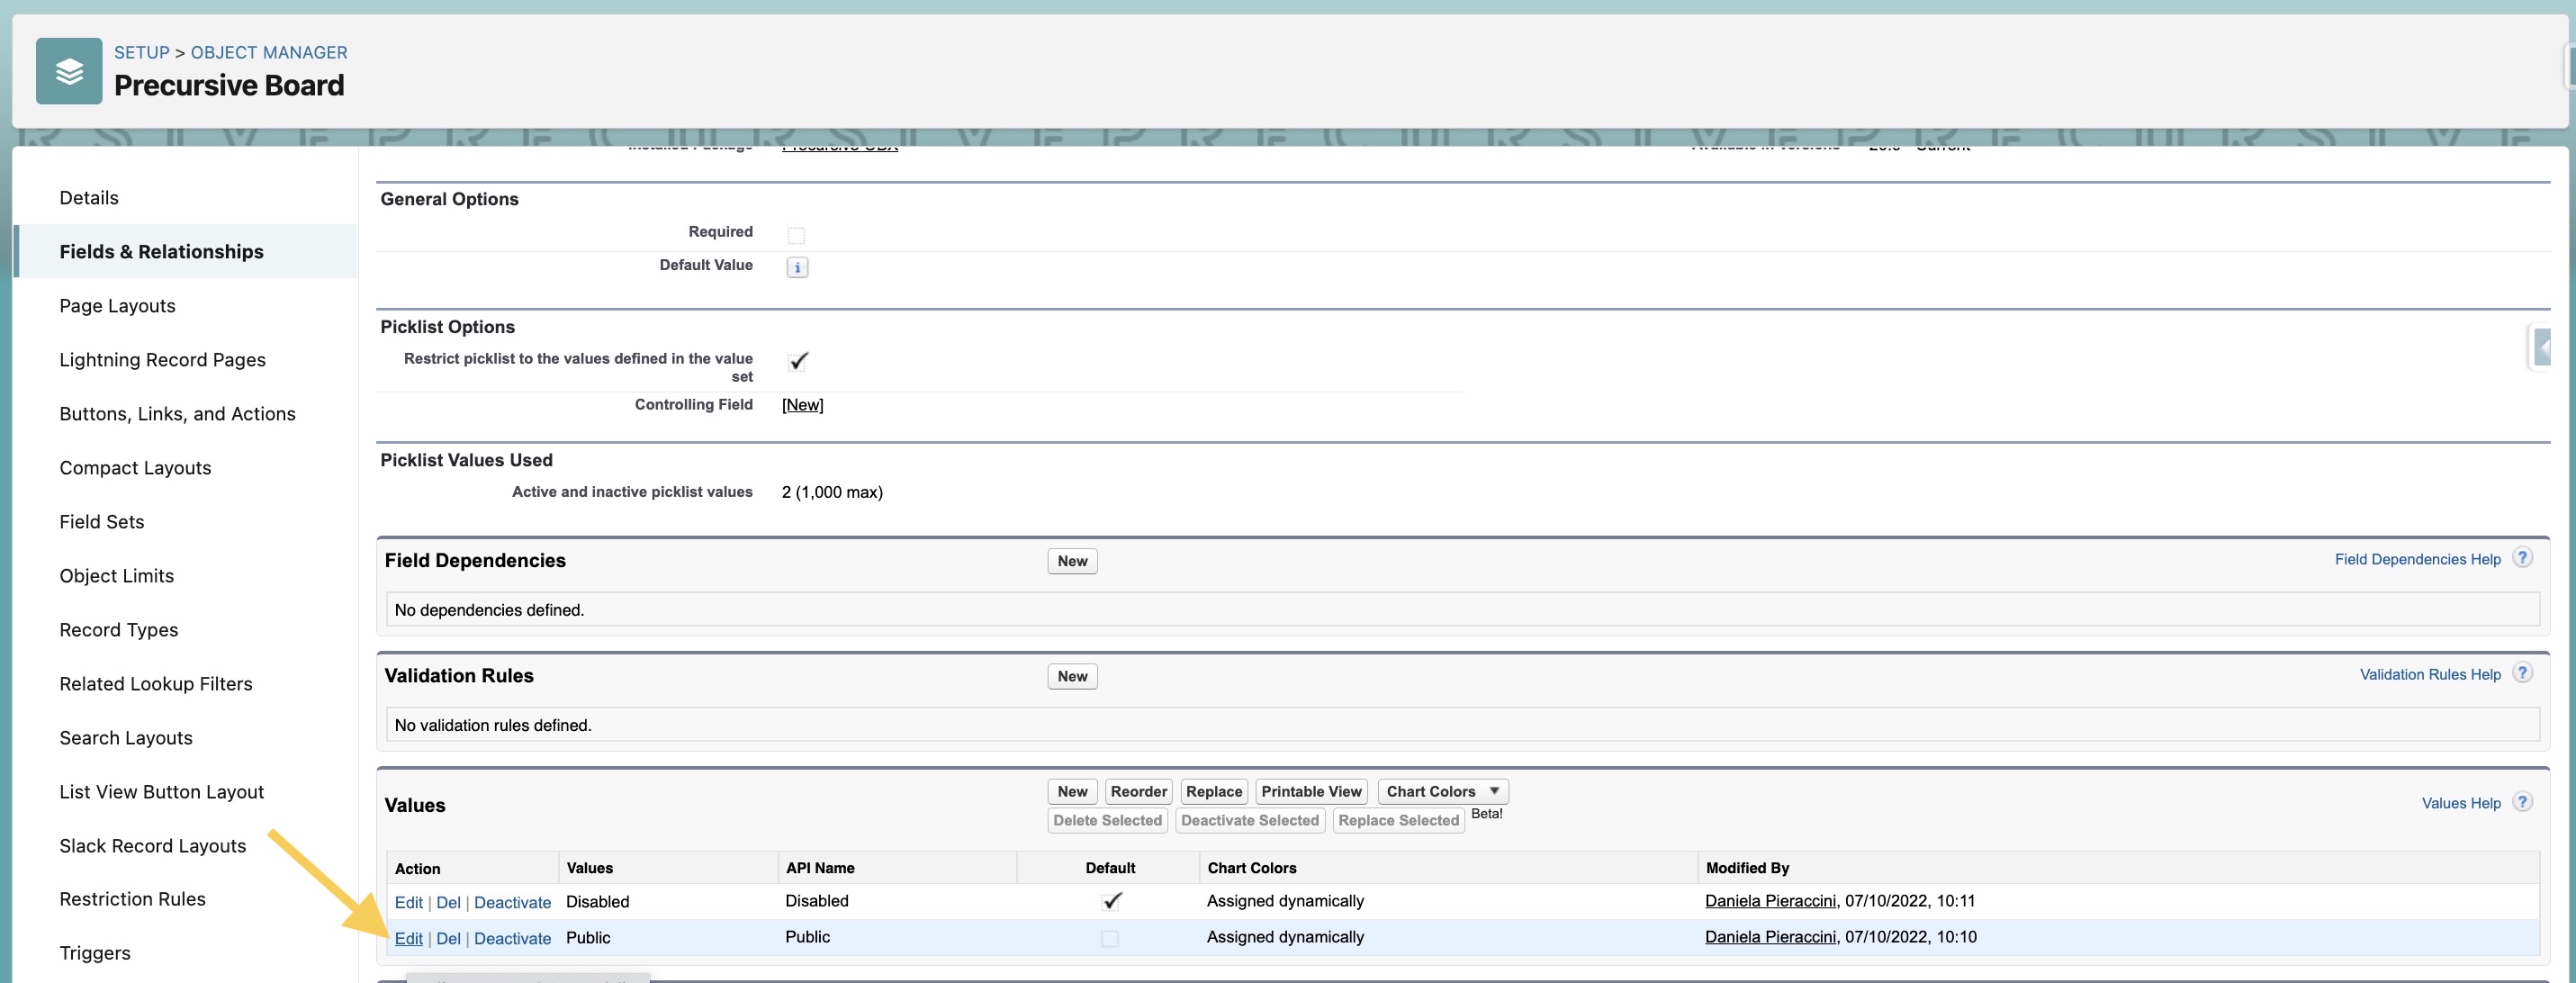
- Scroll down to find the 'Values' section
- Click 'Edit' next to the 'Public' value
- Tick the box 'Make this value the default for the master picklist'
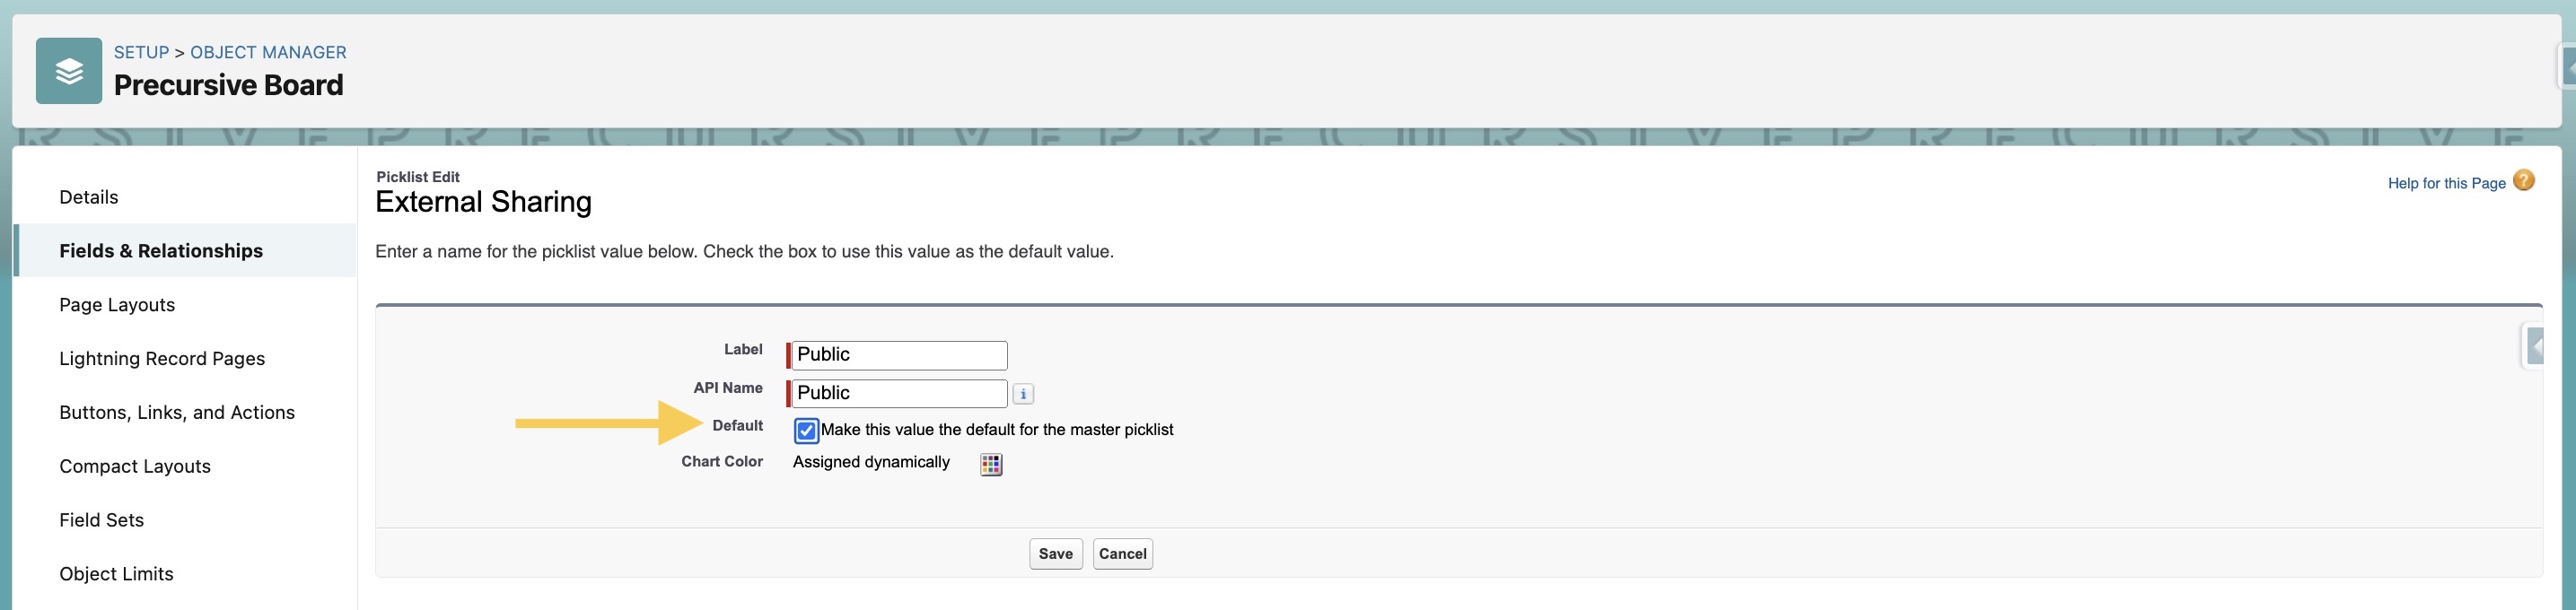
- Save
Field-Level Visibility in External Sharing
By default, External Sharing viewers may not be able to see all of the Precursive data which is visible to your internal users, such as Checklist items or custom fields. However, Salesforce System Administrators can clone the standard Precursive OBX External User permission and configure field-level visibility for the External User Profile.
| Salesforce User Permissions Required |
|---|
| To create and edit Force.com sites: | Customize Application |
Customizing Field-Level Visibility for External Sharing
Use Case
Do you want your customers to see custom fields when you share the plan with them?
Use the steps below to make a Task custom field, such as Notes (rich text area that can contain URLs and images) visible in External Sharing.
|
There are different ways to customize what viewers outside of Salesforce can or cannot see when you share a Board with them using External Sharing.
Firstly, you can predefine any tasks you don’t want viewers to see so you only share those that are relevant to people outside of your organization (Mark Tasks as Internal Only).
For those Tasks that they are allowed to see, only certain parts will be visible by default.
When custom fields are created in Taskfeed Tasks and you wish to display them through External Sharing, your Salesforce Administrator can modify the default permissions that define what External viewers can see.
The Following instructions are a step-by-step guide to modify the default visibility permissions within External Sharing
In the example below, we will enable External Sharing visibility of a custom Notes field in Precursive OBX Task.
To configure these steps, External Sharing must be enabled in your Organization first (Set-up External sharing).
|
SALESFORCE USER PERMISSIONS NEEDED
|
|
To create permission sets:
|
“Manage Profiles and Permission Sets”
|
|
To assign permission sets:
|
“Assign Permission Sets”
|
Step 1
-
Navigate to Setup and in Quick Find enter Permission Sets
-
Find the Precursive OBX External User standard permission set and Clone.
-
Modify the Name and description, then click Save. In our example, we will call this permission Precursive OBX Custom External User.
-
Select the cloned Precursive OBX Customer External User permission.
-
Go to Object Settings and select Precursive OBX Tasks.
-
Click Edit.
-
Go to any custom fields that are currently not visible in External Sharing and select check the Read Access checkbox next to each field (it is not possible to give external viewers Edit Access. If Edit Access is manually selected, Precursive OBX will override those permissions and give Read Access only).
-
Click Save.
Step 2
-
Navigate to Setup and in Quick Find and enter Sites
-
Select Precursive OBX Public Share Services
-
Click Public Access Settings
-
Select View Users
-
Scroll down to Permissions Set Assignments | Manage Assignments
-
Select and modify the appropriate permission set, from Precursive OBX External User to Precursive OBX Custom External User. Click Save.
Related Resources
How to set up the External Sharing option as 'Public' by default