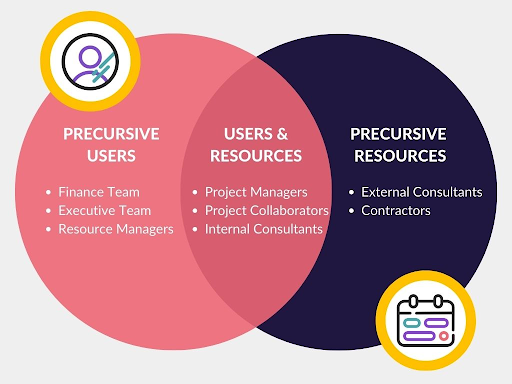
Most people will be both a User and a Resource however some will be Users only and others may be Resources only:
| Require User | Require Resource | Example Roles | Description |
| ✅ | ✅ | Project Managers, Consultants |
Those who need to be assigned to work on projects and need access to the Precursive to manage them or submit their time and expenses.
|
| ❌ | ✅ | External/Temporary Contractors |
When you want to assign work or schedule resources who are not Salesforce users. Resources can be created against Salesforce Contacts or just as Resource only.
For example, you may need to add external consultants as resources in order to assign them to projects and calculate their financial impact based on their contracted rates, but they won't need to have access to your Salesforce environment or Precursive.
|
| ✅ | ❌ | Executives, Finance | Salesforce Users who would need access to Precursive to report on Projects. However, they don't need to be assigned work to collaborate on projects so there's no need to create Resource records for them. |
Here's a diagram that summarizes these 3 options:
Resource Types
Resources can be created for:
| Resource Type | Example | Description |
| User | Internal Project Collaborators | Your Salesforce users who collaborate and need to be scheduled to work on Precursive projects. For example Project Managers, Solution Architects, Internal consultants and so on. These Resources will be created From Users because they also exist as Salesforce Users in your Org. |
| Contact | External Consultants/Contractors/Collaborators | You can also use Precursive to schedule and visualize the work you have assigned to external contributors and consultants. They won't have access to your Precursive Platform and will not be able to log time against projects, but you will be able to see their bookings on the Precursive Plan if you create a Resource from them. They are not Salesforce Users in your org, so for them you want to create a Resource From Contact. Before you can do that, you need to create a Contact for them on your Salesforce first. |
| Non-login (Non-Human) | Non-human Resources |
Precursive also allows you to visualize if you have resources booked for projects in the Precursive Plan even if they have no user or contact linked to them: you can add these as non-human resources.
Non-human Resources are useful if you want to plan and allocate an external resource - like a third party - to a project even if you don't have their Contact in your Salesforce Org. Creating Bookings against Non-human Resources can help you calculate the accurate Cost and Margin for projects where third parties are involved.
|
About Non-Login (Non-Human) Resources
What there is to know:
- Non-human Resources don’t have a login associated with them as they are not linked to a User (or a Contact).
- You can buy a set number of non-human resources that you can use for this purpose.
- You can then create Bookings against your non-human resources to add up to your Projects Planned Time and Cost.
- You can keep track of their planned capacity from the Precursive Plan.
- Their Rate and Cost depend on the Rate Card of the Role assigned to them on a Project and would contribute to the calculations of Planned Revenue and Cost.
- Timesheets are also created for non-human resources and you can make internal users responsible for keeping track of their actual time and submitting their Timesheets. That is usually the responsibility of Project Managers.
- Submitted time for Non-human Resources will contribute to the calculations for the actual time and cost of Projects (the same as any other Resource assigned to it).
- You can use their Planned or Actual Time (if you decide to log that) for Invoicing. If you have a lot of Non-human Resources, a common practice is to base the invoicing on their Planned Time instead of logging their time & submitting Timesheets.
Create and Edit Resources
Edit Resources
To edit the details of a Resource:
- From Precursive HQ, in Quick Find type “Resource”, then select the “Resource” item.
- From the “All Resources” find the Resource in the List
- Against the Resource select Edit.
Bulk Edit Resources
When you want to make a change to a number of Resources in one go this can be done from the Resource tab.
Example to bulk edit Department:
- From the Resources list view, select those which should be assigned to the new department
- Double-click on one of the Department fields next to the selected name. Type in the name of the new department, tick 'Update X selected items' and click 'Apply'
- To save the changes hit the 'Save' button at the bottom of the page
Add Resource
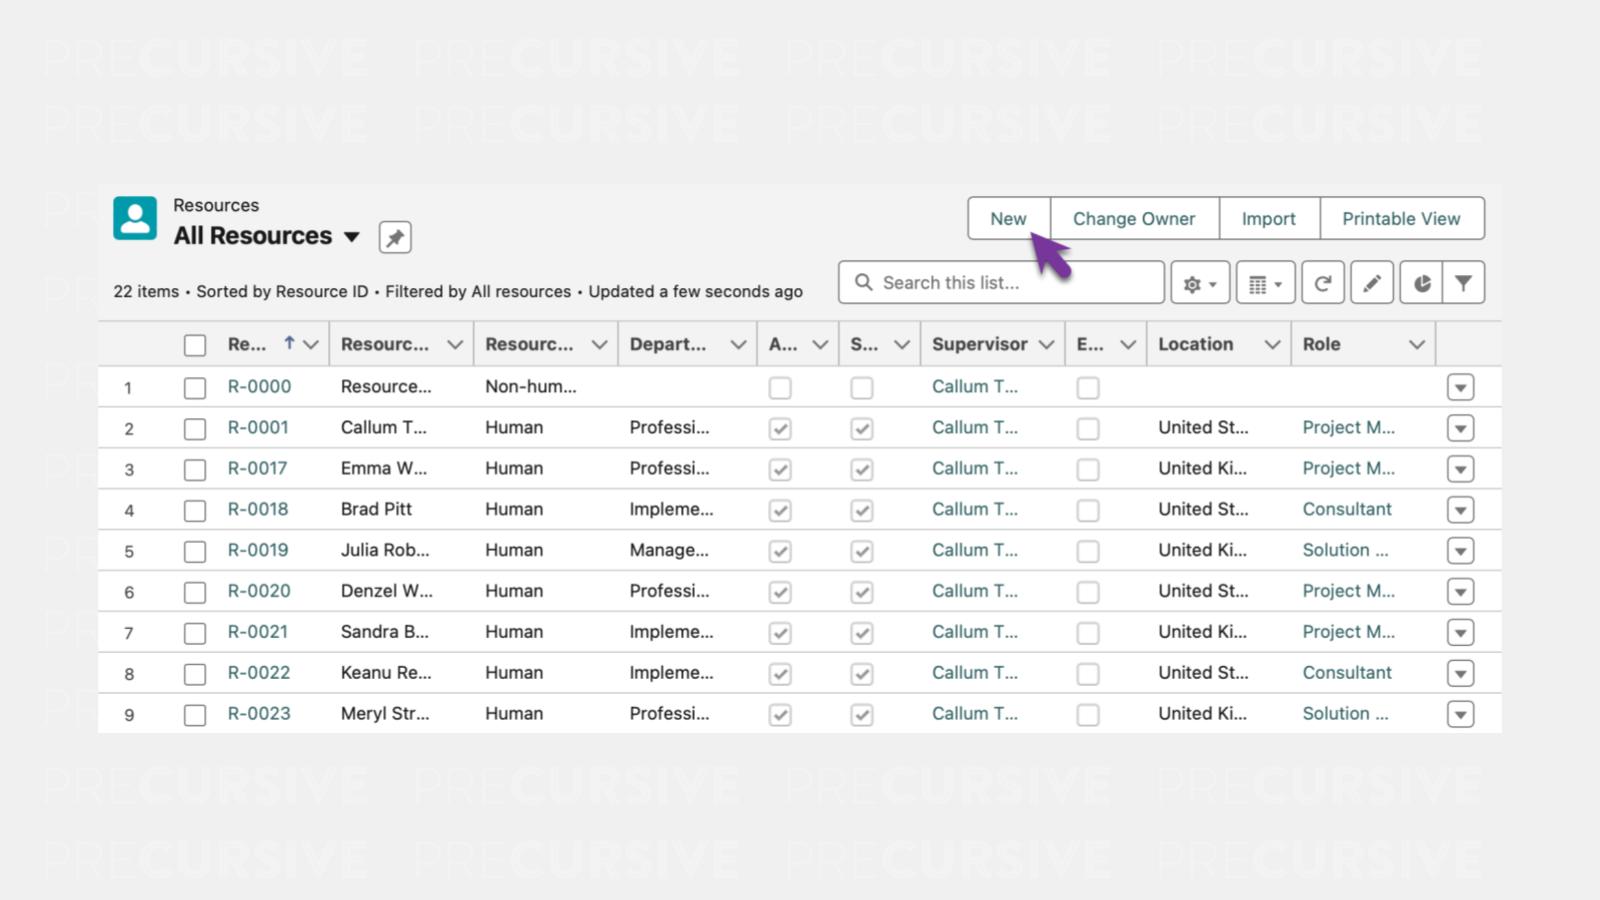
To create a resource:
- From Precursive HQ, in Quick Find type “Resource”, then select the “Resource” item.
- Select 'New'
- In the pop up window, make sure to select the relevant tab: 'From User', 'From Contact' or 'Non-Human' (depending on the type of resources you want to create - see above).
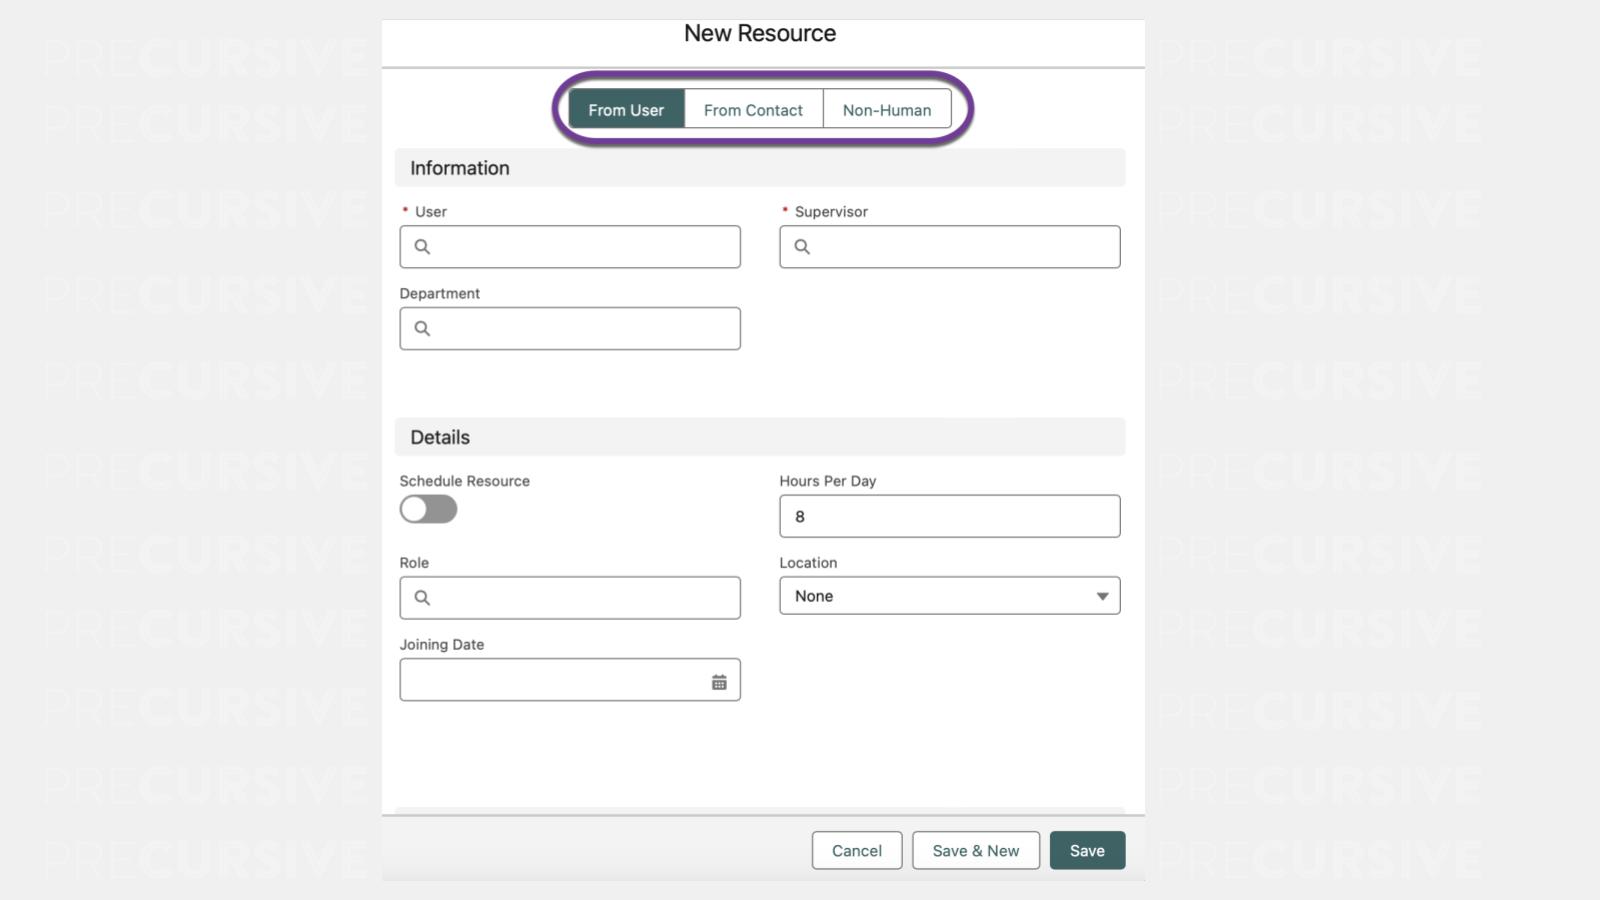
- If you select 'From User' for example, then select the user you making the resource record for
- Tick the 'Schedule Resource' check box to the right to make them schedulable from the Precursive Plan
- Pick their supervisor from the drop down list
- Assign working days
- Specify minimum working hours (per day, or per week),
- Hit 'Save'
Repeat the same process per each resource you would like to add to the Precursive Plan to be scheduled for working on projects.
Resource Information
Active and Scheduleable Resource
Resources that are 'Schedulable' and 'Active' will appear on the Precursive Plan and can be booked to work on Projects.
Joining and Departing Dates
It is important to set up Resources' Joining and Departing Dates as soon as they are known to avoid booking mistakes and make sure you have your utilization calculations always up to date.
In fact:
- Resources utilization is calculated taking into consideration their Joining and Departing date
- Resources cannot be booked before their Joining Date and after their Departing Date
Grades
Your projects will generally require input from a variety of contributors, all at different levels. Grades in Precursive relate to different ranks of your people - e.g. junior, senior, etc. It’s useful to assign grades to your resources to be able to identify the right people quickly.
Assigning Grades to Resources:
- From Precursive HQ, in Quick Find type “Resource”, then select the “Resource” item.
- Click on the gear icon to the right
- Hit 'Select Fields to Display'
- In the pop up window, select Grade from the left column 'Available Fields'
- Use the arrow in between columns to move it to the 'Visible Fields' column
- Hit 'Save'
Now a new column 'Grade' is visible when you view all resources
Department
You might want to assign departments to your Resources - you can then use the filter to view Resources in particular departments of interest.
Tip: If you would like to create a new Department while creating a new Resource, type in the new name of the department and click 'New Department' when filling in the data for the resource.
Resource Costs & Rates
Defining Costs on the Resource will allow Precursive to calculate the Cost impact of a particular Resource to your Projects. The Rate is optional as the Rate should come from the Rate Card.
Assigning Costs & Rates to Resources:
- From Precursive HQ, in Quick Find type “Resource”, then select the “Resource” item.
- Click on the gear icon on the right side of the page, and pick 'Select Fields to Display' option from the drop down list
- In the pop up window, select:
- Hourly Rate
- Hourly Cost
- Click on the arrow sign in between the columns
- Click 'Save'
- Select the resources you’d like to update with the newly added rates and costs, by ticking the checkboxes next to their name
- Click on the pencil icon of the cell you want to edit in the newly added daily cost/daily rates column
- Enter the desired Hourly Rate and Hourly Cost
- Select 'update selected items' to automatically add the cost/rate to all selected participants
- Click 'Apply'. Also, hit the 'Save' button at the bottom of the page
Working Days
Working Days and Hours Per Day fields on Resources impact capacity and utilization calculations.
- Hours Per Day: will affect how their capacity and utilization is calculated and displayed in the Resource Plan and Reporting. If a resource is expected to work 6 hours per day and they get scheduled to work on a Project for 2 hours per day in the first week of the following month, for that week their capacity will show at 33%. If they are expected to work 8 hours per day, for that week their capacity will show at 25%.
- Working Days: you can make sure Non-Working Days are well visible and darkened on the Resource Plan so that resources are not booked to work on their weekly days off.
You can define default Working Days and Hours for your whole organization and then assign different working days to your resources if they vary from the organization default.
Organization-Wide Default Working Days and Hours
You can set and edit your organization default Working Days and Hours from the Precursive HQ:
- From Precursive HQ, in Quick Find type “Resource”, then select the “Resource” item.
- Select a Resource…
Here you can define the Organization-Wide Default Working Days and Hours:
- 'Daily Hours' field according to your organization default
- 'Working Monday', 'Working Tuesday'... checkboxes for the days that you want to assign as Working Days to your resources.
Resource-Specific Working Days and Hours
Precursive Super Users and Admins can also assign different Working Days and Hours to specific Resource:
- From Precursive HQ, in Quick Find type “Resource”, then select the “Resource” item.
- Locate your person and click on their Resource record
- In the 'Hours per Day' field, select the amount of hours this resource is expected to work per day
- In the 'Working Days' section, select the correct working days for this resource by ticking the 'Working Days' checkbox to the left and the relevant working days on the right
NOTE: If the Working days checkbox is not checked then the Organization-Wide Default Working Days will be used.
Non-working Days Visibility on Resource Plan
To have Non-Working Days darkened on the Precursive Plan:
- From Precursive HQ, in Quick Find type “Plan View Settings”, then select the “Plan View Settings” item.
- Check the 'Non-working Days Visibility' checkbox.
Timesheet Required Hours
Required Hours define the minimum number of hours that a resource must submit (per day or per week) on their Timesheet. Unless the required amount of hours per day/week is entered, resources cannot submit their timesheets.
Organization-Wide Default Required Hours
Required Hours can be set Org-wide as a Default.
- From Precursive HQ, in Quick Find type “Timesheet Settings”, then select the “Timesheet Settings” item.
- Select Edit and provide:
- “Timesheet: Weekly Required Hours”
- or 'Timesheets: Required Hours on Monday, Tuesday, Wednesday..' for each day.
When Org-wide defaults will be used unless the Resource has Resource-Specific Required Hours defined.
Resource-Specific Required Hours
Precursive Super Users and Admins can also assign different required daily or weekly hours to specific Resources, if these should differ from the Organization-Wide Settings. Here's how:
- From Precursive HQ, in Quick Find type “Resource”, then select the “Resource” item.
- Locate the Resource and select on their Resource record
- Scroll to the 'Working Hours' section and select your 'Required Hours Limit Type' as Weekly or Daily and according to your selection:
- If you select Weekly, fill the 'Required Hours For Week' field
- If you select 'Daily', fill the 'Required Hours On Monday, Tuesday, Wednesday...' fields
Resources Skills
See
Creating and Assigning Skills
Resource Promotion
Promotions allow you to promote Resources providing a dated change to their Grade and Cost from a specific date onwards. Increased costs of your resources are taken into consideration in budget calculation from the Promotion Date forward with historical records using the Resources Cost from that point-in-time.
Unless a Participants Costs have been set as Fixed, Projects and Phases will now re-calculate Cost in line with the new values for the resource, post promotion. This will only occur from the promotion date onwards. All Promotion records will be saved on the Resource page, allowing you to access historical data.
To update your resource who’s been promoted:
- From Precursive HQ, in Quick Find type “Resource”, then select the “Resource” item.
- Select the resource you’d like to update by clicking on the Resource ID
- When on the resource page, click 'Promote'
- Update the Grade if applicable
- Enter the Promotion Date and new cost
- add a comment if needed
- Hit 'Save'