About
From the Precursive OBX tab you can view, create and work on all your Project Boards and Tasks. You can access this tab from the App Launcher (in Lightning Experience) or from All Tabs (in Classic). Check
How to Personalise your Precursive Navigation Bar to add Precursive OBX to your set of tabs in Salesforce.
The 4 sections of the Precursive OBX Tab
The Precursive OBX Tab is divided in 4 main sections:
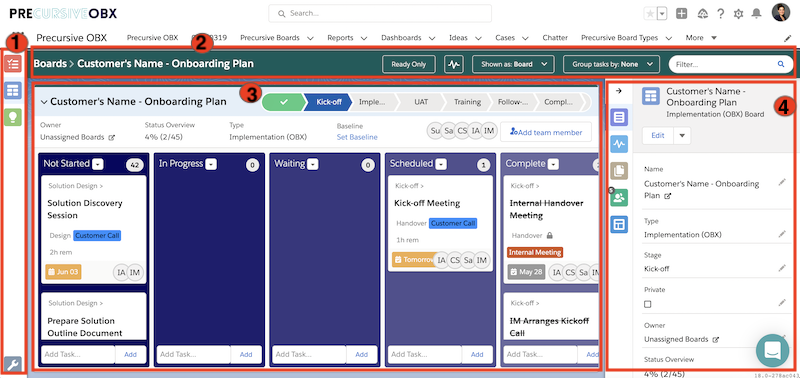
- The Navigation Bar on the left-hand side - where you can find your Boards and Tasks List Views, check your notifications and personalize your settings.
- The Top Bar - where you can filter and group your Tasks, change your Board View and easily access the feed of the open boards.
- The Central Panel - where you can view and manage all your Boards and Tasks, add collaborators to your projects and get an overview of your progress.
- The Right-hand Side Pane - where you can view and edit all the details of your single Boards and Tasks and perform relevant actions against each of them.
The Navigation Bar
From the Navigation Bar you can access your Boards and Tasks List Views, check your notifications and personalize your settings.
The Tasks Menu

Here you can easily access the tasks you and your team have been assigned to. This is a good place where to start your day with Precursive. You can select the 'Todays Tasks' List View to pull a list of all the tasks that are scheduled for you to work on every day across different boards. Remember that whatever list view you select, you can always filter and group the relevant tasks using the options on your Top Bar as explained below. Please see
The Precursive Task Menu for more information.
The Boards Menu

From this icon you can easily access the boards you and your team have been assigned to or create a new board. You can select what boards you would like to display on the central working panel to have a quick overview of your progress or your team's progress across different boards.
Notifications

Here you will see displayed all the notification relevant to tasks and boards assignments. Set your notification in the Settings (as explained in the section below) to receive in-app notifications.
Settings

Here you can manage your Personal Settings and the Application Settings. It's good practice to set your Personal Settings as first step when you start using Precursive. Set your preferences for personal notifications (
Manage my personal notification preferences) and Sync Precursive with your Calendar App (
Calendar Sync).
The Top Bar
You can use options on the Top Bar to filter and group your Tasks and change your Board View to have better visibility of your task dependencies and details. Let's have a look at your options in more details below:
You can filter tasks by entering a word appearing on the Tasks' or Boards' titles in the
Filter Dialog Box 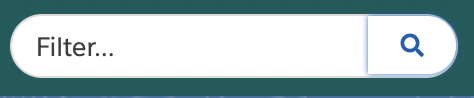
By clicking
Ready Only, you can filter all the Tasks that are scheduled to start on today's date. It is good practice to click on it when you start working on a new Board to have instant access to a list of the Tasks that are ready for you to work on.

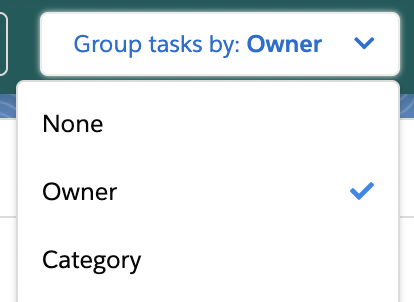
You can
Group Tasks By different criteria, including Owner, Start Date, Category, Parent Tasks, etc..
See
Filtering and Grouping Board's Tasks for more information.
In the
Feed Icon, you can see your Chatter activity. As you share posts and files on Tasks, they will appear here:
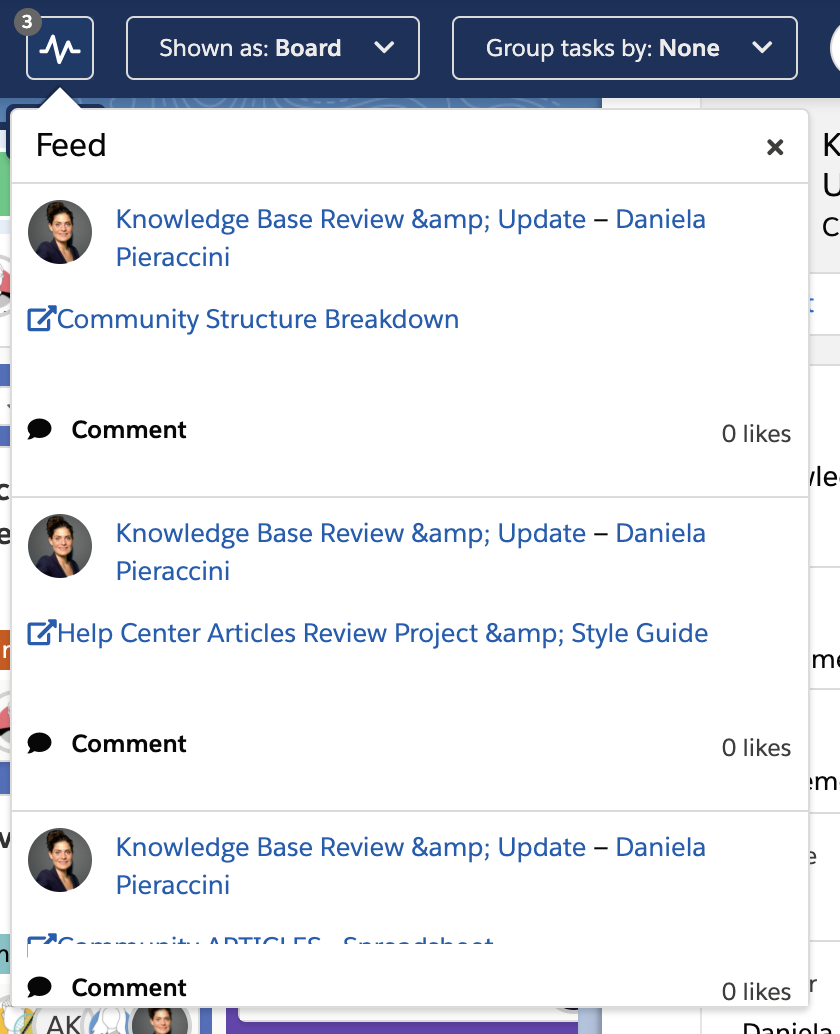
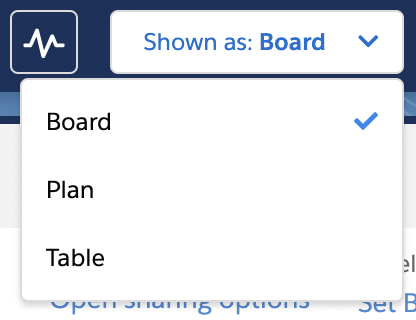
When you are working on a Board, you can change the Board View by clicking
Shown as: Board.For more information on how to get the most out of each view, please check the relevant article:
Board, Plan and Table View.
The Central Panel
The Central Panel is your working platform. Here you can see displayed the Tasks Lists and Boards you select from the relevant icons on the Navigation Bar: you can have an overview of your progress on multiple boards, select and edit your tasks and move them across different lists (or columns).
Let's have a look at what is displayed when you select a single Board or create a New Board and let's get you familiar with some of the terminologies we use to talk about Precursive Project Boards.
The 3 main components of a Precursive Board
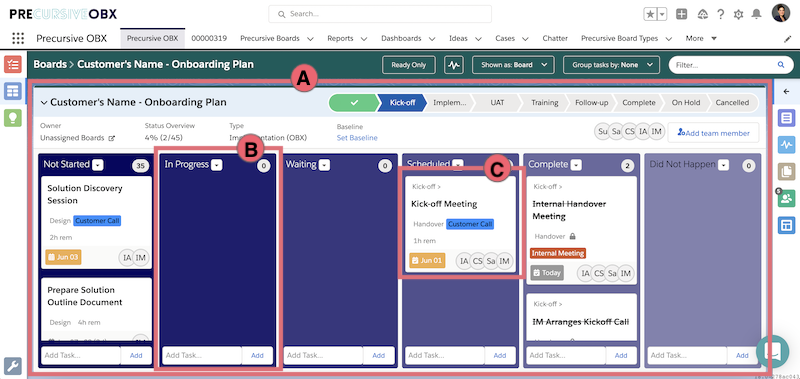
- A) Precursive Project Boards represent the workflow of your projects. Each boards is constituted by a set of Lists and Tasks. Boards can be created from scratch or by using pre-set “Board Types” created for you by your Precursive Super Users. You can add Team Members to your Precursive Board to collaborate on a projects. See Create or Edit a Board for more information.
- B) Lists are the buckets on which you can insert and organize your Tasks. A List needs to be added to a Board before you can start adding Tasks to it. The List Names usually reflect different working stages that your Tasks may go through as you work on your projects, for example 'Not Started', 'In Progress', 'Waiting', 'Not Happened', 'Complete'. Tasks can be grabbed and moved across different lists on the Central Panel. See Create, Edit or Delete a List for more information.
- C) Tasks are the pieces of work that need to get done to complete your projects. When creating a Task you can inster a variety of information, such as Start and End Dates, Checklists, Shared Notes and Files. Tasks can be assigned to more than one individual and time can be logged against them. See Create or Edit a task for more information.
The Right-hand Side Pane
On this section you can see displayed all the details and actions you can take on each Board or Task when that is selected. Let's have a look at the different icons and details you can find here.
You will be able to see the first 4 icons whether you select a Board or a Task.
Boards / Task Details
On this section you will view and edit all the general details of the Board or Task you have selected.
Feed

Here you will be able to access the Chatter relevant to the Board or Task you have selected. You can send messages, share links and files with the people who are collaborating with you on the project. You can make sure they get notified of your message by tagging their name (type @ and the name of the person) when posting a message on the feed.
Attachments

Here you can view and upload any Document that is relevant to the Task or Board you selected.
Contributors

In this section will be displayed all the people that have been added as Contributors to that Board or Task. From here you can also add Team Member or Task Contributors to collaborate on the project. See
Add or Remove a Board Team Member for more information.
Checklist

Here you can view and add Checklist items to your Tasks. Think about this as a To-Do List where you can ass all the smaller pieces of work you need to make sure you go through in oder to complete said Task. See
Task Checklists for more information.
Subtasks

You can group a set of Subtasks to a bigger, Parent Task. You can use Subtasks to break down a Task into smaller parts and distribute the work among multiple contributors. If you select a Parent Task, here you will see all the Subtask that are related to it and you can access their details by clicking on them. See
Subtasks for more information.
Logged Time

Here you can Log Time against your Tasks. See
Logging Time on Tasks for more information.
Related Resources
How to Manage Precursive Project Boards in 10 Steps